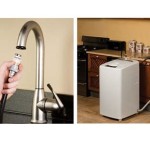
How To Change Sink Faucet
Replacing a sink faucet is a relatively simple plumbing task that can be completed in a few hours. By following these step-by-step instructions, you can save yourself the cost of hiring a plumber and have a new faucet installed in no time.
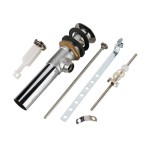
Tools and Materials You'll Need:
- New faucet
- Adjustable wrench
- Pliers
- Basin wrench
- Teflon tape
- Bucket
- Flashlight (optional)
Step 1: Turn Off the Water Supply
Before you begin, turn off the water supply to the sink. There should be two shut-off valves located under the sink, one for hot water and one for cold water. Turn both valves clockwise until they are completely closed.
Step 2: Disconnect the Old Faucet
Use an adjustable wrench to loosen the nuts that hold the faucet in place. Be careful not to overtighten the nuts, as this could damage the faucet or the sink. Once the nuts are loose, remove the old faucet from the sink.
Step 3: Clean the Faucet Base
Once the old faucet is removed, clean the base of the faucet where the new faucet will be installed. Use a sponge or cloth to remove any dirt or debris. You may also want to use a flashlight to inspect the base for any damage.
Step 4: Install the New Faucet
Place the new faucet in the sink and align the holes in the base with the holes in the sink. Apply a thin layer of Teflon tape to the threads of the faucet mounting bolts. This will help to create a watertight seal.
Step 5: Tighten the Mounting Bolts
Use an adjustable wrench to tighten the mounting bolts that hold the faucet in place. Be sure to tighten the bolts evenly so that the faucet is secure.
Step 6: Connect the Water Supply Lines
Connect the water supply lines to the new faucet. The hot water line should be connected to the red or blue inlet on the faucet, and the cold water line should be connected to the other inlet. Use an adjustable wrench to tighten the nuts on the water supply lines.
Step 7: Turn On the Water Supply
Turn on the water supply valves under the sink and check for leaks. If there are any leaks, tighten the nuts on the water supply lines or the mounting bolts on the faucet.
Step 8: Test the Faucet
Once the water supply is turned on, test the faucet to make sure it is working properly. Turn the handle to the hot and cold positions and check for any leaks. If there are any leaks, tighten the nuts on the water supply lines or the mounting bolts on the faucet.
Tips:
- If you are not comfortable working with plumbing, it is best to call a plumber to replace the sink faucet.
- Be sure to purchase a faucet that is compatible with your sink.
- Use a flashlight to inspect the base of the faucet for any damage.
- Tighten the nuts on the water supply lines and the mounting bolts on the faucet evenly.
- Test the faucet to make sure it is working properly before using it.

How To Replace A Kitchen Sink Faucet Youtube

How To Replace A Kitchen Faucet

Diy How To Replace And Install A Bathroom Sink Faucet Youtube

How To Change A Kitchen Faucet Family Handyman

Handyman Services Sink Faucet Replacement Ez Handy Inc

How To Replace A Kitchen Faucet Youtube

How To Replace A Kitchen Faucet Young House Love

How To Replace A Kitchen Faucet For Newbies Anika S Diy Life

How To Replace A Kitchen Faucet Beginner S Guide The Handyman Daughter

How To Replace A Bathroom Faucet Removal And Installation