Replace Water Shut Off Valve Under Bathroom Sink
A water shut off valve is a crucial component of any bathroom, as it allows you to quickly and easily turn off the water supply in the event of a leak or other emergency. If the shut off valve under your bathroom sink is old or damaged, it is important to replace it as soon as possible to avoid any potential problems. Replacing a water shut off valve is a relatively simple task that can be completed in just a few minutes.
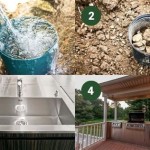
Tools and Materials You Will Need:
- New water shut off valve
- Adjustable wrench
- Plumber's tape
- Bucket
Step-by-Step Instructions:
1. Turn off the water supply to the sink.
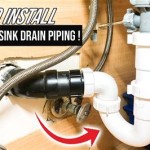
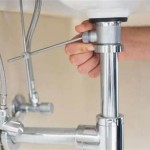
The first step is to turn off the water supply to the sink. This is typically done by turning the shut off valves located under the sink. If there are no shut off valves under the sink, you will need to turn off the main water supply to the house.2. Place a bucket under the shut off valve.
This will catch any water that leaks out when you remove the old shut off valve.3. Loosen the packing nut.
The packing nut is the large nut that is located at the base of the shut off valve. Use an adjustable wrench to loosen the packing nut. Be careful not to overtighten the packing nut, as this can damage the valve.4. Remove the old shut off valve.
Once the packing nut is loose, you can remove the old shut off valve by simply unscrewing it from the water supply line.5. Wrap the threads of the new shut off valve with plumber's tape.
Plumber's tape helps to create a watertight seal between the shut off valve and the water supply line. Wrap the threads of the new shut off valve with several layers of plumber's tape, making sure to overlap the tape by about 1/2 inch.6. Screw the new shut off valve onto the water supply line.
Hand-tighten the new shut off valve onto the water supply line. Once the shut off valve is hand-tight, use an adjustable wrench to tighten it an additional 1/4 to 1/2 turn.7. Tighten the packing nut.
Use an adjustable wrench to tighten the packing nut until it is snug. Be careful not to overtighten the packing nut, as this can damage the valve.8. Turn on the water supply to the sink.
Check for leaks around the shut off valve. If there are any leaks, tighten the packing nut or the shut off valve until the leaks stop.9. Repeat steps 1-8 for the other shut off valve under the sink.
If there is another shut off valve under the sink, repeat steps 1-8 to replace it.10. You are now finished.
You have now successfully replaced the water shut off valve under your bathroom sink.
How To Install Water Shut Off Valve For Sinks Youtube

How To Replace A Leaking Shutoff Valve Under Sink Youtube

Types Of Under Sink Shutoff Valves Kitchen Infinity

Handle Broke Off On Shut Valve Under Sink Diy Plumbing Repair Bathroom

How To Replace A Shut Off Valve Under Your Sink Youtube

Install Shut Off Valve Under Sink Replace Faucet Mobile Home Repair

How To Replace A Shutoff Valve Diy Family Handyman

How To Replace Shutoff Valve Under Bathroom Sink Youtube

How To Repair A Leaking Sink Shut Off Valve Doityourself Com

Condo Blues How To Replace Plumbing Valves Without Soldering