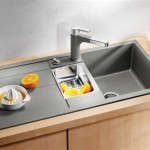
Drilling Into Stainless Steel Sink: A Comprehensive Guide
Stainless steel sinks are a common fixture in both residential and commercial kitchens due to their durability, resistance to corrosion, and aesthetic appeal. However, modifications, such as installing a new faucet, soap dispenser, or filtered water tap, often require drilling holes into the sink's surface. Drilling into stainless steel presents unique challenges due to its hardness and tendency to work harden. This article provides a comprehensive guide on how to drill into a stainless steel sink effectively, minimizing the risk of damage and ensuring a clean, professional-looking result.
Before initiating any drilling operation, careful planning and preparation are essential. This involves selecting the appropriate tools, understanding the properties of stainless steel, and implementing safety precautions to safeguard both the user and the sink.
Selecting the Right Tools and Materials
The success of drilling into stainless steel relies heavily on using the right tools. Choosing substandard equipment can lead to frustration, damage to the sink, and potentially, personal injury. The following tools and materials are considered essential:
Drill: A variable-speed drill is crucial. The ability to control the speed allows for slower drilling, which is critical for working with stainless steel. Cordless drills offer greater portability, but a corded drill may provide more consistent power for extended drilling sessions.
Drill Bits: Cobalt drill bits are the preferred choice for drilling stainless steel. Cobalt is a high-speed steel alloyed with cobalt, which significantly increases its heat resistance and hardness. Titanium-coated drill bits are also suitable, offering reasonable durability and performance at a lower price point. However, they may not last as long as cobalt bits when drilling through thicker stainless steel.
Step Drill Bit (Unibit): A step drill bit, also known as a Unibit, is an excellent option for creating larger holes. Its stepped design allows for drilling holes of various sizes without changing the bit. It also tends to produce cleaner, rounder holes than using standard drill bits for larger diameters. The step drill bit minimizes the risk of the bit catching and damaging the sink.
Center Punch and Hammer: A center punch is used to create a small indentation at the exact location where the hole is to be drilled. This indentation provides a starting point for the drill bit, preventing it from wandering and scratching the sink's surface. A hammer is used to tap the center punch, creating the indentation.
Cutting Oil/Lubricant: Applying cutting oil or lubricant is paramount when drilling stainless steel. The lubricant reduces friction between the drill bit and the metal, dissipating heat and preventing the bit from overheating and dulling. It also helps to produce a cleaner cut and extends the lifespan of the drill bit. Specialized cutting oils for stainless steel are available, but general-purpose machine oil or even a thick motor oil can be used as alternatives.
Safety Glasses: Protecting the eyes is crucial when drilling any material. Safety glasses should be worn at all times to protect against flying metal chips and debris.
Gloves: Wearing gloves provides a better grip and protects the hands from sharp edges and potential heat from the drilling process.
Masking Tape: Applying masking tape to the area around the intended hole helps to protect the sink's finish from scratches and scuffs during the drilling process. It also provides a visual guide for centering the drill bit.
Deburring Tool or File: After drilling, a deburring tool or file is used to remove any sharp edges or burrs around the hole. This ensures a smooth and safe surface.
Preparation and Marking the Drilling Location
Once the necessary tools and materials are gathered, the next step involves preparing the sink and accurately marking the drilling location. This step requires careful attention to detail to avoid errors that could result in misplaced holes or damage to the sink.
Cleaning the Surface: Thoroughly clean the area where the hole is to be drilled. Remove any dirt, grease, or residue with a suitable cleaning agent. A clean surface ensures better adhesion of the masking tape and provides a clearer view of the intended drilling location.
Applying Masking Tape: Apply several layers of masking tape to the area surrounding the intended hole. The masking tape acts as a protective barrier, preventing scratches and scuffs from the drill bit or other tools. It also provides a surface on which to mark the drilling location clearly.
Marking the Center Point: Using a measuring tape or ruler, accurately determine the center point of the intended hole. Mark the center point on the masking tape with a permanent marker or pen. Double-check the measurement to ensure accuracy.
Creating an Indentation with the Center Punch: Place the tip of the center punch on the marked center point. Hold the center punch firmly and strike the top of the punch with a hammer. Apply enough force to create a small indentation in the stainless steel. The indentation should be deep enough to guide the drill bit and prevent it from wandering.
Verifying the Location: Before proceeding with drilling, carefully verify the location of the indentation. Ensure that it is precisely where the hole is intended to be. Any discrepancies should be corrected before drilling to avoid misplaced holes.
The Drilling Process: Step-by-Step Guide
The drilling process itself requires precision and patience. Rushing the process or applying excessive pressure can damage the drill bit or the sink. The following step-by-step guide outlines the proper technique for drilling into stainless steel sinks:
Securing the Sink: If possible, secure the sink to a stable surface to prevent it from moving during the drilling process. Clamps or other securing devices can be used to hold the sink in place.
Starting with a Pilot Hole: Begin by drilling a small pilot hole using a small-diameter drill bit (e.g., 1/8 inch). The pilot hole provides a starting point for the larger drill bit and helps to prevent it from wandering. Apply cutting oil to the drill bit and the surface of the sink before drilling.
Drilling at a Slow Speed: Set the drill to a slow speed. Drilling stainless steel at high speeds generates excessive heat, which can dull the drill bit and work harden the metal. Work hardening makes the stainless steel even more difficult to drill.
Applying Consistent Pressure: Apply consistent, moderate pressure to the drill. Avoid forcing the drill bit through the metal, as this can damage the bit and the sink. Let the drill bit do the work. If the drilling becomes difficult, stop and apply more cutting oil.
Using Cutting Oil Frequently: Apply cutting oil frequently throughout the drilling process. This helps to keep the drill bit cool and lubricated, preventing overheating and extending its lifespan. It also helps to produce a cleaner cut.
Gradually Increasing the Hole Size: If the intended hole size is larger than the pilot hole, gradually increase the hole size by using successively larger drill bits. This reduces the strain on the drill bit and minimizes the risk of damaging the sink. For larger holes, a step drill bit is highly recommended.
Using a Step Drill Bit: If using a step drill bit, start with the smallest step and gradually increase the hole size by applying consistent pressure and using cutting oil. The step drill bit will create a clean, round hole without the risk of the bit catching and damaging the sink.
Monitoring Heat: Monitor the temperature of the drill bit and the sink surface. If the drill bit becomes excessively hot, stop drilling and allow it to cool down. Applying more cutting oil can also help to dissipate heat.
Maintaining a Straight Angle: Ensure that the drill bit is held at a straight angle to the sink surface throughout the drilling process. Drilling at an angle can create an oval-shaped hole or damage the sink.
Completing the Hole: Once the hole is drilled through the stainless steel, carefully remove the drill bit. Inspect the hole for any sharp edges or burrs.
Deburring the Hole: Use a deburring tool or file to remove any sharp edges or burrs around the hole. This ensures a smooth and safe surface. Carefully smooth out any rough edges to prevent injury.
Cleaning the Area: Clean the area around the hole to remove any metal shavings or debris. Remove the masking tape and clean the sink surface with a suitable cleaning agent.
Inspection: Thoroughly inspect the finished hole for any imperfections or damage. Ensure that the hole is the correct size and shape and that there are no cracks or distortions in the surrounding metal.
By following these steps carefully, drilling into a stainless steel sink can be accomplished successfully and safely, resulting in a clean and professional-looking modification.

How To Drill Hole In Stainless Steel Sink Step By

How To Drill A Hole In Stainless Steel Sink Simple Easy

How To Make A Hole In Stainless Steel Sink

Drilling Large Holes In Stainless Steel The Easy Way

Top Tips For Drilling Holes In Stainless Steel Sinks Bsp Diamond Tools Manufacturer

Top Tips For Drilling Holes In Stainless Steel Sinks Bsp Diamond Tools Manufacturer

How To Drill Hole Any Sink Easy Simple

How To Drill A Tap Hole On Stainless S Bunnings Work Community

How To Cut A Hole In Kitchen Sink

Drilling A Hole In Stainless Steel Sink With 35mm Metal Saw