Installing a Vanity Sink: A Step-by-Step Guide
Installing a vanity sink is a common home improvement project that can significantly enhance the appearance and functionality of a bathroom. This process involves replacing an existing sink or installing a new one in a previously unused space. While it might seem daunting, with proper planning and execution, it can be a relatively straightforward task. This article will provide a comprehensive step-by-step guide on how to install a vanity sink, covering everything from necessary materials and tools to the installation process itself.
Step 1: Gathering Materials and Tools
Before embarking on the installation process, it is essential to gather all necessary materials and tools. This will ensure a smooth and efficient project. The following list outlines the essential items:
- Vanity sink and countertop (if applicable)
- Faucet and drain assembly
- P-trap and drainpipe
- Supply lines (hot and cold)
- Silicone sealant
- Caulk gun
- Plumber's putty
- Adjustable wrench
- Channel-lock pliers
- Level
- Tape measure
- Utility knife
- Drill with appropriate drill bits
- Screwdriver set
- Safety glasses
- Work gloves
It is advisable to carefully review the instructions provided with the vanity sink, faucet, and other components for specific recommendations regarding materials and tools. The manufacturer's guidelines may include additional items not listed above.
Step 2: Preparing the Space
The next step involves preparing the space where the vanity sink will be installed. This includes clearing the area around the installation site and disconnecting the existing sink, if applicable. Here are the key steps:
- Clear the Area: Remove all items from the bathroom countertop and surrounding area to create a clear workspace. This will minimize the risk of damage or injury during the installation process.
- Disconnect Existing Sink: If replacing an existing sink, carefully disconnect the water supply lines and drainpipe. Turn off the water supply valves to the sink, and then use a wrench to loosen the nuts connecting the supply lines to the sink. Similarly, disconnect the drainpipe, making sure to collect any residual water.
- Remove Old Sink: Once the water supply and drainpipe are disconnected, remove the old sink and countertop, if applicable. Carefully lift the sink to avoid damaging the surrounding area.
Step 3: Installing the Vanity Sink
With the space prepared, it's time to install the vanity sink. This step involves attaching the sink to the countertop, connecting the water supply lines, and installing the drain assembly. Here's a detailed explanation:
- Attach Sink to Countertop: If installing a separate vanity sink and countertop, ensure the sink is properly secured to the countertop using the provided hardware. Follow the manufacturer's instructions closely to ensure proper alignment and stability.
- Connect Supply Lines: Connect the hot and cold water supply lines to the faucet using the appropriate fittings and wrenches. Ensure the connections are tight and secure. It is generally recommended to use Teflon tape on the threads to prevent leaks.
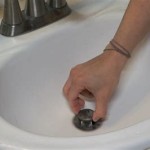
- Install Drain Assembly: Attach the drain pipe to the sink's drain opening using plumber's putty to ensure a watertight seal. Connect the P-trap to the drain pipe and secure it to the drain line.
- Install Faucet: Install the faucet according to the manufacturer's instructions. This typically involves attaching the faucet to the sink's holes and tightening the mounting nuts.
- Seal and Caulk: Apply silicone sealant around the base of the sink and countertop to prevent water leakage. Allow the sealant to dry completely before using the sink.
Once the vanity sink has been installed, it is crucial to test for leaks. Turn on the water supply and check for leaks at the connections between the supply lines, the faucet, and the drain assembly. If any leaks are detected, tighten the connections or apply additional sealant as needed.
Step 4: Final Touches
The final steps in installing a vanity sink involve completing the installation process and ensuring a smooth and functional sink. These steps include:
- Clean and Dry: Clean the sink and surrounding area to remove any dirt, dust, or debris from the installation process. Use a soft cloth and mild cleaning solution to avoid scratching the surface. Dry the sink thoroughly.
- Connect Water Supply: Once you are satisfied with the installation, connect the water supply lines to the main water supply valve. Turn the valve on and check for leaks again.
- Test Functionality: Run the water in the sink, checking for leaks at the faucet, drain, and other connections. Also, test the drain function to ensure it is working properly. If any issues are detected, address them promptly.
By following these comprehensive steps and paying close attention to detail, you should be able to successfully install a vanity sink. Remember to prioritize safety throughout the process, wearing safety glasses and gloves when necessary. You can also consult a professional plumber for assistance if you encounter any difficulties or prefer not to handle certain aspects of the installation.

How To Install A Bathroom Vanity

Bathroom Sink Plumbing Installation

Easy Ways To Install A Vanity Top With Pictures Wikihow

How To Replace And Install A Bathroom Sink

How To Install A New Bathroom Vanity And Sink Family Handyman

How To Install A Bathroom Vanity

How To Install A Vessel Sink Step By Instructions Youtube

How To Replace And Install A Bathroom Sink

Drop The Bathroom Sink Into Vanity Countertop Rona

How To Remove Bathroom Basin Install New Sink Vanity Unit Step By Diy Guide