How To Attach Bathroom Sink To Vanity
Installing a bathroom sink can be a relatively simple task, but it does require some basic plumbing knowledge and skills. If you're not comfortable working with plumbing, it's best to hire a professional plumber. However, if you're confident in your abilities, here are the steps on how to attach a bathroom sink to a vanity:
1. Gather Your Tools and Materials
Before you begin, you'll need to gather the following tools and materials:
- Bathroom sink
- Vanity
- Faucet
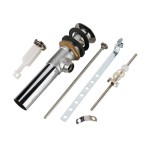
- Pop-up drain
- Plumber's putty
- Caulk
- Adjustable wrench
- Channel locks
- Screwdriver
2. Prepare the Vanity
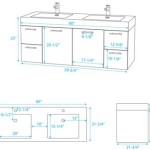
The first step is to prepare the vanity for the sink. This involves cutting out the hole for the sink and installing the faucet. To cut out the hole for the sink, use a jigsaw or a hole saw. Be sure to measure the sink carefully and make the hole slightly smaller than the sink so that it will fit snugly.
Once the hole is cut, install the faucet. The faucet should come with instructions on how to install it. Once the faucet is installed, you can move on to the next step.
3. Install the Pop-Up Drain
The next step is to install the pop-up drain. The pop-up drain is what allows you to open and close the drain. To install the pop-up drain, first remove the old drain. Then, apply a bead of plumber's putty to the bottom of the new drain. Next, insert the drain into the hole in the sink. Finally, tighten the drain nut until it is snug.
4. Apply Plumber's Putty to the Sink
Once the pop-up drain is installed, you can apply plumber's putty to the sink. Plumber's putty is a type of sealant that helps to create a watertight seal between the sink and the vanity. To apply plumber's putty, simply roll it into a rope and then place it around the rim of the sink. Be sure to apply the putty evenly and to press it firmly into place.
5. Install the Sink
The next step is to install the sink. To do this, carefully lift the sink and place it into the hole in the vanity. Be sure to align the sink with the faucet and the pop-up drain. Once the sink is in place, press down on it firmly to set it in place.
6. Tighten the Sink Nuts
Once the sink is in place, you need to tighten the sink nuts. The sink nuts are located underneath the sink and they hold the sink in place. To tighten the sink nuts, use an adjustable wrench or channel locks. Be sure to tighten the nuts until they are snug, but do not overtighten them.
7. Caulk Around the Sink
The final step is to caulk around the sink. Caulk is a type of sealant that helps to prevent water from leaking between the sink and the vanity. To caulk around the sink, simply apply a bead of caulk around the edge of the sink. Be sure to apply the caulk evenly and to press it firmly into place.
Once the caulk is applied, you can allow it to dry for 24 hours before using the sink.

How To Install A Bathroom Vanity Youtube

How To Install A Bathroom Vanity Youtube

12 Easy Steps To Install Bathroom Vanity And Sink

How To Install Or Remove A Bathroom Vanity Homeserve Usa

Youtube

The 9 Steps For Installing A Bathroom Vanity Ryan Old Plumbing

Tutorial How To Install A Bathroom Vanity The Diy Playbook

How To Install A Vanity Forbes Home

Replace Vanity Top And Faucet Diy Network Youtube

Bathroom Vanity Installation Tips Newsnews