How To Change Pipes Under Kitchen Sink
Leaking pipes under the kitchen sink can be a major inconvenience. Not only can they cause water damage to your cabinets and flooring, but they can also be a breeding ground for bacteria. If you're experiencing a leaky pipe under your kitchen sink, it's important to fix the problem as soon as possible.
The good news is that changing pipes under the kitchen sink is a relatively easy plumbing repair that you can do yourself with a few basic tools. Here's a step-by-step guide on how to do it:
Step 1: Gather your tools and materials.
You will need the following tools and materials to change pipes under the kitchen sink:
- Adjustable wrench
- Plumber's putty
- Pipe wrench
- New pipes
- Teflon tape
- Basin wrench
- Bucket
Step 2: Turn off the water supply.
The first step is to turn off the water supply to your kitchen sink. There should be two shut-off valves under the sink, one for the hot water and one for the cold water. Turn both valves clockwise to turn off the water.
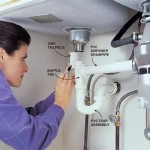
Step 3: Disconnect the old pipes.
Use the adjustable wrench to loosen the nuts that connect the old pipes to the faucet and the water supply valves. Be careful not to overtighten the nuts, as this could damage the pipes.
Step 4: Apply plumber's putty to the new pipes.
Roll a small amount of plumber's putty into a snake shape and wrap it around the threads of the new pipes. The plumber's putty will help to create a watertight seal between the pipes and the fittings.
Step 5: Install the new pipes.
Screw the new pipes into the faucet and the water supply valves. Hand-tighten the nuts as much as possible, then use the adjustable wrench to tighten them further. Be careful not to overtighten the nuts, as this could damage the pipes.
Step 6: Apply Teflon tape to the threads.
Wrap a few layers of Teflon tape around the threads of the pipes where they connect to the fittings. The Teflon tape will help to create a watertight seal between the pipes and the fittings.
Step 7: Connect the water supply.
Turn on the water supply valves and check for leaks. If you see any leaks, tighten the nuts until the leaks stop.
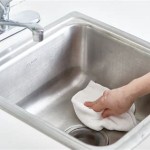
Step 8: Clean up.
Use a bucket to catch any water that spills during the repair. Once the repair is complete, clean up the area under the sink and dispose of the old pipes.
Changing pipes under the kitchen sink is a relatively easy plumbing repair that you can do yourself with a few basic tools. By following these steps, you can save yourself the cost of hiring a plumber.

How To Install The Kitchen Sink Drain Pipes Youtube

How To Change Under Sink Plumbing Add Bunnings Work Community

How To Connect A Kitchen Sink Drain

Plumbing How To Remove Rusted Remains Of Kitchen Sink Tailpiece Home Improvement Stack Exchange

Kitchen Sink Plumbing How To Make A Drain Better

How To Connect A Kitchen Sink Drain 2024

How To Remove A Kitchen Sink Drain 13 Steps With Pictures

How To Remove And Replace Old Kitchen Sink Drain Pipe Save Money

4 Simple Ways To Fix A Leaky Sink Drain Pipe Wikihow

How To Install A Kitchen Sink Drain