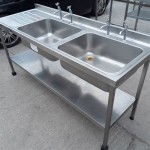
How To Fix A Leaking Sink Trap
A leaking sink trap is a common plumbing issue that, if left unattended, can lead to water damage, mold growth, and unpleasant odors. The sink trap, usually a P-trap or S-trap located under the sink, is designed to hold water, preventing sewer gases from entering the building. When this trap develops a leak, prompt action is necessary to mitigate potential problems. This article provides a comprehensive guide to diagnosing and fixing a leaking sink trap.
Identifying the Source of the Leak
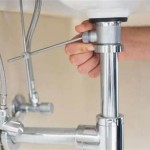
Before attempting any repairs, accurately identifying the source of the leak is critical. Several areas of the sink trap assembly are prone to leaking. The first step involves a thorough visual inspection. Use a flashlight to examine the entire trap, including the connections between the trap arm, the U-bend, and the drainpipe. Look for visible drips, dampness, or mineral buildup, which can indicate the origin of the leak. Pay close attention to the slip nuts, the plastic or metal fasteners that connect the different sections of the trap. These are common points of failure, particularly if they are loose or cracked.
Another potential leak source is the trap itself. Cracks can develop in the plastic or metal of the trap, especially in older systems. Examine the U-bend and the trap arm for any signs of damage. Also, inspect the connection where the tailpiece (the pipe connecting the sink drain to the trap) enters the trap. If the tailpiece is not properly aligned or the connection is loose, it can cause a leak.
Finally, check the drainpipe where the trap connects to the wall. This connection can sometimes become loose or corroded, resulting in a leak. Run water down the drain for a few minutes while observing the trap and its connections to confirm the precise location of the leak. If the leak is difficult to pinpoint visually, carefully dry the entire trap assembly with a clean cloth and then run water down the drain again. The location where water reappears will indicate the source of the leak.
Tightening Loose Connections
Once the source of the leak is identified, the first course of action is usually to attempt tightening any loose connections. This is often the simplest and most effective solution for minor leaks. Before proceeding, place a bucket or pan under the sink trap to catch any water that may spill during the process. Using channel-lock pliers or a wrench, carefully tighten the slip nuts that connect the different sections of the trap. It is crucial to avoid over-tightening the nuts, as this can damage the plastic or metal and potentially worsen the leak. Tighten the nuts only enough to ensure a snug fit. After tightening, run water down the drain to check if the leak has been resolved. If the leak persists, further investigation and repair may be necessary.
When tightening slip nuts, ensure they are properly aligned with the pipe threads. Cross-threading can damage the nuts and pipes, leading to leaks. If a slip nut is difficult to tighten, it may be cross-threaded or damaged. Remove the nut and inspect the threads for any signs of damage. If the threads are damaged, the nut or the connected pipe may need to be replaced. In some cases, applying a small amount of Teflon tape to the threads can help improve the seal and prevent leaks.
If the leak originates from the connection between the tailpiece and the trap, ensure that the tailpiece is properly inserted into the trap. The tailpiece should be aligned straight and securely connected to the drain. If the tailpiece is loose or misaligned, it can cause water to leak around the connection. Tighten the slip nut connecting the tailpiece to the trap, ensuring that the nut is snug but not overly tight.
Replacing Worn or Damaged Parts
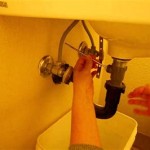
If tightening the connections does not resolve the leak, the next step is to consider replacing worn or damaged parts of the sink trap. This may involve replacing the slip nuts, washers, the U-bend, the trap arm, or even the entire trap assembly. Before removing any parts, turn off the water supply to the sink. This will prevent water from flowing into the drain and causing a mess during the repair process. Place a bucket under the trap to catch any remaining water.
To remove the trap, loosen the slip nuts connecting the trap to the tailpiece and the drainpipe. Carefully detach the trap from the plumbing system. Once the trap is removed, inspect the individual components for any signs of damage, such as cracks, corrosion, or warping. Replace any parts that appear to be worn or damaged. Slip nuts and washers are often the easiest and least expensive components to replace. Ensure that the new slip nuts and washers are the correct size and type for the existing plumbing system. When installing new washers, make sure they are properly seated within the slip nut to create a watertight seal.
If the U-bend or trap arm is cracked or corroded, it should be replaced. Replacement traps are available at most hardware stores and home improvement centers. When purchasing a replacement trap, ensure that it is compatible with the existing plumbing system in terms of size and material. Plastic traps are generally less expensive and easier to install, while metal traps are more durable but may require more specialized tools and skills. When installing the new trap, follow the manufacturer's instructions carefully. Ensure that all connections are properly aligned and tightened to prevent leaks.
If the drainpipe connection is leaking, it may be necessary to replace the drainpipe or the fitting connecting the trap to the drainpipe. This can be a more complex repair, requiring cutting and reassembling the drainpipe. If you are not comfortable performing this type of repair, it is best to consult a qualified plumber. When replacing any plumbing components, use Teflon tape or pipe dope on the threads to ensure a watertight seal. Apply the Teflon tape or pipe dope evenly and sparingly to avoid clogging the drain.
Addressing Specific Leak Scenarios
Certain leak scenarios require specific solutions. For instance, if the leak is occurring at the point where the tailpiece connects to the sink drain, the problem may be related to the drain flange or the plumber's putty used to seal the drain to the sink. Remove the drain flange and clean away any old plumber's putty. Apply a fresh layer of plumber's putty to the underside of the drain flange and re-install it, tightening the screws evenly to create a watertight seal. Wipe away any excess putty.
If the leak is occurring at the joint between the trap arm and the drainpipe, the issue may be with the alignment of the trap. Ensure that the trap is properly aligned with the drainpipe and that the trap arm is fully inserted into the drainpipe fitting. If the trap arm is too short or too long, it may be necessary to adjust the length of the trap arm by cutting it with a pipe cutter or adding an extension piece. Use a pipe cutter designed for plastic or metal pipes, depending on the material of the trap arm. When cutting the trap arm, ensure that the cut is clean and straight to prevent leaks.
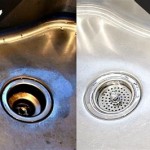
In some cases, the leak may be caused by a blockage in the trap. Over time, debris such as hair, grease, and food particles can accumulate in the trap, causing it to clog. A clogged trap can create pressure that can lead to leaks. To clear a clogged trap, first try using a plunger to dislodge the blockage. If the plunger is not effective, remove the trap and clean it out by hand or with a plumber's snake. Be sure to wear gloves when handling the trap contents, as they can be unsanitary. Rinse the trap thoroughly with water before re-installing it.
If the sink trap is old and corroded, it may be more cost-effective to replace the entire assembly rather than attempting to repair individual components. A new sink trap assembly will ensure a watertight seal and prevent future leaks. When selecting a new sink trap assembly, choose one that is compatible with the existing plumbing system and that meets all applicable plumbing codes. Follow the manufacturer's instructions carefully when installing the new trap assembly. Double-check all connections to ensure they are properly aligned and tightened to prevent leaks.
Maintaining a leak-free sink trap requires periodic inspection and maintenance. Regularly check the trap for any signs of leaks, corrosion, or damage. Tighten any loose connections and clean out any debris that may be accumulating in the trap. By taking these preventive measures, you can avoid costly repairs and prevent water damage to your home. If you are unsure about any aspect of the repair process or if the leak persists after attempting the recommended solutions, consult a qualified plumber for assistance. Attempting complex repairs without the necessary knowledge and skills can lead to further damage and potentially hazardous situations.

Easy Ways To Fix A Leaky Sink Trap 12 Steps With Pictures

How To Fix Kitchen Sink P Trap Leaking Pipe Connection Nut

How To Fix Or Replace A Leaky Sink Trap Hometips

4 Simple Ways To Fix A Leaky Sink Drain Pipe Wikihow

Plumbing Drain Trap Leaking At Compression Joint Home Improvement Stack Exchange

Easy Fix A Leaky Sink P Trap Or Clean Stinky Drain

How To Repair A Leaking Sink Trap

Why Is My Kitchen Sink P Trap Leaking At Connection Nut Youtube

Leaky Sink Basket Strainer How To Fix The Most Common Leak Youtube

Quick Tip For A Kitchen Sink Drain That Is Leaking