How To Fix A Leaky Bathroom Sink
A leaky bathroom sink is a common problem that can be frustrating to deal with. The good news is that it's usually a relatively easy fix that you can do yourself. In this article, we will walk you through the steps on how to fix a leaky bathroom sink.
Step 1: Gather Your Tools
Before you start, you'll need to gather a few tools. Here's a list of what you'll need:
- Adjustable wrench
- Pliers
- Screwdriver
- Plumber's putty
- Replacement washer (if necessary)
Step 2: Turn Off the Water Supply
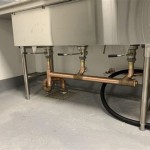
The first step is to turn off the water supply to the sink. There should be two shut-off valves under the sink, one for the hot water and one for the cold water. Turn both valves clockwise to shut off the water.
Step 3: Remove the Aerator
The aerator is the part of the faucet that screws onto the end of the spout. It helps to aerate the water, which makes it flow more smoothly. To remove the aerator, simply unscrew it by hand. If it's stuck, you can use a pair of pliers to gently loosen it.
Step 4: Check the Washer
Once you've removed the aerator, you'll see a washer. The washer is a small rubber or plastic ring that helps to create a seal between the aerator and the faucet. If the washer is worn or damaged, it can cause a leak. To check the washer, simply remove it from the faucet and inspect it. If it's worn or damaged, you'll need to replace it.
Step 5: Replace the Washer
To replace the washer, simply insert the new washer into the faucet. Make sure that the washer is properly seated and that it's not twisted or folded. Once the washer is in place, screw the aerator back onto the faucet.
Step 6: Tighten the Packing Nut
The packing nut is a large nut that is located at the base of the faucet. It helps to keep the faucet in place and prevent leaks. To tighten the packing nut, simply use an adjustable wrench to turn it clockwise. Be careful not to over-tighten the packing nut, as this could damage the faucet.
Step 7: Apply Plumber's Putty
Plumber's putty is a type of sealant that is used to create a watertight seal around the base of the faucet. To apply plumber's putty, simply roll it into a rope and then wrap it around the base of the faucet. Make sure that the putty is evenly distributed and that it covers the entire base of the faucet.
Step 8: Turn on the Water Supply
Once you've applied the plumber's putty, turn on the water supply and check for leaks. If there are any leaks, simply tighten the packing nut a little bit more. Once the leak is stopped, you can wipe away any excess plumber's putty.

How To Fix A Leaking Bathroom Sink Paschal Air Plumbing Electric

Bathroom Sink Drain Leaking Around Threads Premier Plumbing Inc

Common Sink Leaks You Could Probably Fix Yourself

Do You Have A Leaking Bathroom Sink Learn About The Possible Causes Water Line Repair In Lake Worth Tx Benjamin Franklin Plumbing

Properly Fixing A Leaky Sink Faucet Wallside Windows

How To Fix A Leaky Faucet True Value

4 Easy Ways To Fix A Leaky Bathroom Sink Faucet With Double Handle

How To Fix A Leaky Bathroom Sink Faucet

5 Reasons Your Faucet Is Dripping Water How To Fix It

Loose And Leaking Plastic Bathroom Sink Drain Repair Youtube