How To Fix Leak Under Bathroom Sink
A leak under the bathroom sink can be a frustrating and potentially costly problem. If not addressed promptly, it can lead to water damage, mold growth, and even structural damage. Fortunately, fixing a leak under the bathroom sink is a relatively simple task that can be completed in a few hours with the right tools and materials.
Step 1: Identify the Source of the Leak
Before you can fix the leak, you need to identify its source. Check the following areas for signs of water damage or dripping:
- Faucet base
- Drainpipes
- Supply lines
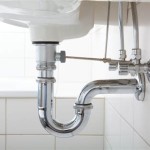
- P-trap
Once you have identified the source of the leak, you can proceed with the appropriate repair.
Step 2: Gather the Necessary Tools and Materials
Depending on the source of the leak, you may need the following tools and materials:
- Wrench
- Pliers
- Screwdriver
- Plumber's putty
- Teflon tape
- Replacement parts (e.g., washers, gaskets)
Step 3: Turn Off the Water Supply
Before you start any repairs, it is important to turn off the water supply to the bathroom sink. This will prevent water from leaking out and causing further damage.
Step 4: Remove the Faucet Handle
If the leak is coming from the faucet base, you will need to remove the faucet handle to access the washer. Use a screwdriver to remove the handle screw and pull the handle straight up.
Step 5: Replace the Washer
Once the faucet handle is removed, you will need to replace the washer. Use pliers to remove the old washer and replace it with a new one. Make sure that the new washer is the correct size and type for your faucet.
Step 6: Reinstall the Faucet Handle
Once the new washer is in place, you can reinstall the faucet handle. Align the handle with the screw hole and push it down until it is snug. Tighten the handle screw using a screwdriver.
Step 7: Check for Leaks
Turn the water supply back on and check for leaks. If the leak has been fixed, you will not see any more water dripping from the faucet.
Step 8: Fix Leaks from Drainpipes
If the leak is coming from the drainpipes, you will need to tighten the connections. Use a wrench to tighten the nuts that hold the drainpipes in place. If the leak persists, you may need to replace the washers or gaskets.
Step 9: Fix Leaks from Supply Lines
If the leak is coming from the supply lines, you will need to replace the washers or gaskets. Use a wrench to loosen the nuts that hold the supply lines in place, and then remove the old washers or gaskets. Replace them with new ones and tighten the nuts.
Step 10: Fix Leaks from the P-trap
If the leak is coming from the P-trap, you may need to tighten the nuts that hold it in place. Use a wrench to tighten the nuts, and then check for leaks. If the leak persists, you may need to replace the P-trap.
Fixing a leak under the bathroom sink is a relatively simple task that can be completed in a few hours with the right tools and materials. By following the steps outlined in this guide, you can save yourself the cost of hiring a plumber and ensure that your bathroom sink is leak-free.

How To Fix A Leaking Bathroom Sink Paschal Air Plumbing Electric

Bathroom Sink Drain Leaking Around Threads Premier Plumbing Inc

Common Sink Leaks You Could Probably Fix Yourself

How To Fix Pipework A Tap Faucet Leaking Under The Sink Youtube

Bathroom Sink Drain Leaking Around Threads Premier Plumbing Inc

How To Fix Constant Leak Under Bathroom Bunnings Work Community

How To Fix Constant Leak Under Bathroom Bunnings Work Community

Hose Under Your Sink Is Leaking Here S What You Have To Do

Bathroom Sink Drain Leak Not Sure How To Fix Doityourself Com Community Forums

How To Repair A Leak Under The Sink Home Sweet Youtube