How To Install Bathroom Sink
Installing a bathroom sink may seem like a daunting task, but it is actually a relatively straightforward project that can be completed in a few hours. By following these step-by-step instructions, you can save yourself the cost of hiring a plumber and have a new sink installed in no time. ### Tools and Materials You'll Need - New bathroom sink - Sink drain - Sink faucet - Adjustable wrench - Plumber's putty - Caulking gun - Caulk - Level - Measuring tape - Screwdriver ### Step-by-Step Guide1. Remove the old sink
If you are replacing an existing sink, the first step is to remove it. Turn off the water supply valves under the sink and disconnect the water supply lines. Then, unscrew the nuts that hold the sink in place and carefully lift it out of the cabinet.2. Prepare the new sink
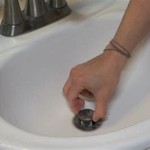
Before installing the new sink, you need to prepare it by attaching the drain and faucet. Apply a bead of plumber's putty around the base of the drain and insert it into the drain hole in the sink. Tighten the drain nut by hand, then use an adjustable wrench to tighten it further. Next, install the faucet according to the manufacturer's instructions. Be sure to use Teflon tape on the threads of the water supply lines to prevent leaks.3. Set the sink in place
Once the sink is prepared, you can set it in place in the cabinet. Carefully lift the sink into the cabinet and align it with the drain hole. Apply a bead of caulk around the edge of the sink where it meets the countertop. This will help to seal the joint and prevent leaks.4. Connect the water supply lines
Once the sink is in place, you can connect the water supply lines. Attach the water supply lines to the faucet and tighten the nuts by hand. Then, use an adjustable wrench to tighten the nuts further.5. Connect the drain
Next, you need to connect the drain. Insert the drain pipe into the drain hole in the sink and tighten the slip nut. Then, connect the other end of the drain pipe to the drainpipe in the wall.6. Level the sink
Once the sink is connected, you need to level it. Place a level on the sink and adjust the leveling bolts until the sink is level in both directions.7. Caulk around the sink
Finally, you need to caulk around the sink to seal the joint between the sink and the countertop. Apply a bead of caulk around the edge of the sink where it meets the countertop. Use your finger or a caulk tool to smooth the caulk.8. Turn on the water supply
Once the caulk has dried, you can turn on the water supply. Check for any leaks around the sink and faucet. If you find any leaks, tighten the nuts or bolts as needed.
How To Install A Bathroom Vanity And Sink

How To Install A Bathroom Sink Step By Guide

How To Fit A Bathroom Sink Diy Guides Victorian Plumbing

Here S How Install A Bathroom Pedestal Sink

How To Install A Bathroom Sink Youtube

Bathroom Sink Plumbing Installation Diy Montreal

How To Install A Bathroom Sink Taskrabbit Blog

Plumbing Repairs How To Repair Fix It Diy Installation

How To Replace And Install A Bathroom Sink

How To Install Or Remove A Bathroom Vanity Homeserve Usa