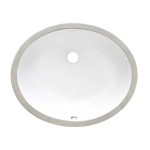
How To Install Drop In Sink
Installing a drop-in sink is a relatively easy project that can be completed in a few hours with the right tools and materials.
Tools You'll Need
- Adjustable wrench
- Basin wrench
- Caulk gun
- Caulking
- Level
- Measuring tape
- Phillips head screwdriver
- Putty knife
- Rags
- Rubber mallet
- Safety glasses
- Tape measure
- Utility knife
- Wrenches
Materials You'll Need
- Drop-in sink
- Faucet
- Pop-up drain assembly
- Sink strainer
- Plumber's putty
- Silicone caulk
Before You Begin
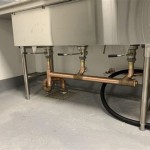
Before you begin, you need to gather all of your tools and materials. You should also turn off the water supply to your sink and disconnect the water lines. Once you have done this, you can remove the old sink.
Step 1: Clean the Countertop
The first step is to clean the countertop where the new sink will be installed. This will help to ensure a good seal between the sink and the countertop. You can use a cleaner and degreaser to clean the surface.
Step 2: Apply Plumber's Putty
Once the countertop is clean, you need to apply plumber's putty to the underside of the sink rim. The plumber's putty will help to seal the sink to the countertop and prevent leaks.
Step 3: Set the Sink in Place
Once you have applied the plumber's putty, you can set the sink in place. Be sure to center the sink on the countertop and align it with the drain hole.
Step 4: Tighten the Sink Clips
Once the sink is in place, you need to tighten the sink clips. The sink clips will help to hold the sink in place and prevent it from moving.
Step 5: Install the Faucet
Once the sink is secure, you can install the faucet. The faucet will need to be connected to the water supply lines. Once the faucet is installed, you can turn on the water supply and check for leaks.
Step 6: Install the Drain Assembly
The next step is to install the drain assembly. The drain assembly will allow water to drain from the sink. The drain assembly will need to be connected to the sink drain hole.
Step 7: Install the Sink Strainer
The final step is to install the sink strainer. The sink strainer will help to catch food and debris from going down the drain.
Tips for Installing a Drop-In Sink
- Be sure to measure the countertop before you purchase a sink. The sink should be the same size as the countertop or slightly smaller.
- Use a level to make sure that the sink is level before you tighten the sink clips.
- Apply a bead of silicone caulk around the edge of the sink to seal it to the countertop.
- Allow the caulk to dry completely before using the sink.

Diy Installation Guide For Stainless Steel Drop In Sinks

How To Install A Drop In Sink Professionally Ge Sealants

How To Install A Drop In Sink Do S And Dont

How To Install A Drop In Kitchen Sink

How To Install A Drop In Sink Your Kitchen

How To Install A Drop In Sink Your Kitchen

Ge Sealants How To Install A Drop Sink

How To Install A Drop In Kitchen Sink Lowe S

How To Install A Stainless Steel Drop In Sink Moen Installation

How To Install A Drop In Kitchen Sink Lowe S