How to Install Kitchen Sink Plumbing
Installing a kitchen sink is not as difficult as it may seem, but it does require some planning and precision. By following these steps, you can ensure that your new sink is installed correctly and without leaks.
Step 1: Gather Your Materials
Before you begin, you will need to gather the following materials:
*Step 2: Remove the Old Sink
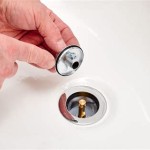
Once you have gathered your materials, you can begin by removing the old sink. To do this, first turn off the water supply to the sink. Then, disconnect the drainpipe and the water supply lines. Once the sink is disconnected, you can remove it from the countertop. To make things even easier, ask for assistance from a friend or a family member.
Step 3: Prepare the Countertop
Before you can install the new sink, you need to prepare the countertop. This may involve cutting a hole in the countertop for the sink, or it may simply involve cleaning the area where the sink will be installed. If you are installing a new countertop, you will need to cut a hole for the sink. To do this, you will need to use a jigsaw or a hole saw. Once the hole is cut, you can clean the area and apply a bead of silicone caulk around the edge of the hole.
Step 4: Install the Sink
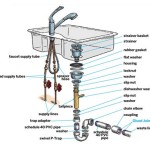
Now you are ready to install the new sink. To do this, first place the sink in the hole in the countertop. Then, connect the drainpipe to the sink. Next, connect the water supply lines to the sink. Once the sink is connected, you can tighten the nuts on the water supply lines and the drainpipe. Finally, apply a bead of silicone caulk around the edge of the sink.
Step 5: Install the Faucet
The next step is to install the faucet. To do this, first insert the faucet into the hole in the sink. Then, tighten the nuts on the faucet. Next, connect the water supply lines to the faucet. Once the faucet is connected, you can turn on the water supply and check for leaks. If there are any leaks, you can tighten the nuts on the water supply lines.
Step 6: Install the Garbage Disposal (Optional)
If you are installing a garbage disposal, you will need to do so before you connect the drainpipe to the sink. To install the garbage disposal, first insert the disposal into the hole in the sink. Then, tighten the nuts on the disposal. Next, connect the drainpipe to the disposal. Once the disposal is connected, you can turn on the water supply and check for leaks. If there are any leaks, you can tighten the nuts on the drainpipe.
Step 7: Finishing Up
Once you have installed the sink, the faucet, and the garbage disposal (if applicable), you can finish up by applying a bead of silicone caulk around the edges of the sink and the faucet. You can also install a backsplash if you desire. Once the caulk has dried, your new kitchen sink will be ready to use.
How To Install A Kitchen Sink Drain
How To Install Kitchen Sink Drain For Beginners
Kitchen Sink Plumbing How To Make A Drain Better
How To Install The Kitchen Sink Drain Pipes
How To Install A Kitchen Sink Drain With Pictures Wikihow
How To Connect A Kitchen Sink Drain
How To Install A Kitchen Sink Drain With Pictures Wikihow
Pin Page
How To Install A Kitchen Sink Drain
Realty Times How To Install Pvc Pipe Under Kitchen Sink Best Tips And Tricks