How To Install a New Kitchen Sink
Installing a new kitchen sink can dramatically improve the functionality and aesthetics of a kitchen. While professional installation ensures a flawless result, a confident homeowner with basic plumbing skills and the correct tools can successfully complete the project. This article provides a comprehensive guide to the process, covering preparation, removal of the old sink, installation of the new sink, and connection of the plumbing.
Before embarking on the installation, it is crucial to understand the scope of the project. Is the replacement sink the same size and configuration as the existing one? Are there any modifications required to the countertop or plumbing to accommodate the new sink? Answering these questions upfront will prevent unexpected complications and delays during the installation process. Furthermore, verifying local plumbing codes and regulations is essential to ensure compliance and avoid potential penalties.
Key Point 1: Preparation and Safety
Thorough preparation is paramount to a successful sink installation. This involves gathering the necessary tools and materials, safely disconnecting the water supply, and preparing the workspace. Safety precautions are equally important to prevent injury and property damage.
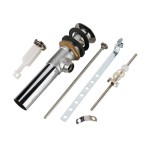
Tools and Materials Required:
- New kitchen sink
- Basin wrench
- Adjustable wrench
- Pliers
- Screwdrivers (Phillips and flathead)
- Putty knife or scraper
- Plumber's putty or silicone sealant
- Plumber's tape (Teflon tape)
- Measuring tape
- Pencil
- Safety glasses
- Gloves
- Bucket
- Rags or towels
- New supply lines (if needed)
- New drain assembly (if needed)
- Drop cloth
Disconnecting the Water Supply: Locate the shut-off valves beneath the sink. These valves control the hot and cold water supply to the faucet. Turn both valves clockwise to shut off the water supply completely. To ensure the water is completely shut off, turn on the faucet to relieve any residual pressure. Place a bucket underneath the supply lines to catch any remaining water.
Preparing the Workspace: Clear the area under the sink of all items. Place a drop cloth on the floor to protect it from spills and debris. Having ample workspace will make the installation process significantly easier and safer.
Safety Precautions: Wear safety glasses to protect eyes from debris. Gloves are recommended to protect hands from sharp edges and chemicals. Exercise caution when working with plumbing fixtures, as some components may be fragile or corroded. If unsure about any aspect of the installation, consult a qualified plumber.
Key Point 2: Removing the Old Sink
Removing the existing sink requires careful disconnection of the plumbing and the physical detachment of the sink from the countertop. This process should be performed methodically to avoid damage to the countertop or existing plumbing.
Disconnecting the Plumbing: Begin by disconnecting the drain pipes. Use a basin wrench to loosen the slip nuts that connect the drain pipes to the sink drain. Place a bucket underneath the pipes to catch any water that may be present. Next, disconnect the supply lines from the faucet. Use an adjustable wrench to loosen the connections. Again, have a bucket ready to catch any residual water.
Removing the Faucet: Depending on the faucet configuration, it may be easier to remove the faucet before removing the sink. Disconnect the supply lines from the faucet. Use a basin wrench to loosen the nuts that secure the faucet to the sink. Lift the faucet out of the sink.
Detaching the Sink: The sink is typically attached to the countertop with clips or a bead of sealant. If clips are used, loosen or remove them with a screwdriver. If sealant is used, use a putty knife or scraper to carefully break the seal between the sink and the countertop. Work slowly and cautiously to avoid damaging the countertop. Once the sink is detached, carefully lift it out of the opening. It may be heavy, so have assistance available if needed.
Cleaning the Countertop: After removing the old sink, thoroughly clean the countertop surface. Remove any old sealant or debris with a scraper and a cleaning solution. Ensure the surface is clean and dry before installing the new sink.
Key Point 3: Installing the New Sink and Connecting Plumbing
Installing the new sink involves preparing the sink, securing it to the countertop, and connecting the drain and water supply lines. Proper installation is crucial to prevent leaks and ensure long-term functionality.
Preparing the New Sink: Install the faucet and drain assembly on the new sink before placing it in the countertop opening. Refer to the manufacturer's instructions for specific installation procedures. Apply plumber’s putty or silicone sealant around the drain opening to create a watertight seal. Tighten the drain assembly securely.
Securing the Sink to the Countertop: Apply a bead of plumber’s putty or silicone sealant around the perimeter of the countertop opening. Carefully lower the new sink into the opening, ensuring it is properly aligned. Press down firmly to seat the sink in the sealant. Install the clips or mounting hardware that came with the new sink. Tighten the clips gradually and evenly to secure the sink to the countertop. Wipe away any excess sealant with a damp cloth.
Connecting the Drain Plumbing: Connect the drain pipes to the new drain assembly. Ensure all connections are tight and secure. Use plumber's tape on threaded connections to prevent leaks. Check for leaks by running water into the sink. If any leaks are detected, tighten the connections further or reapply plumber's tape.
Connecting the Water Supply Lines: Connect the water supply lines to the faucet. Use plumber's tape on the threaded connections. Ensure the connections are tight and secure. Turn on the shut-off valves slowly and check for leaks. If any leaks are detected, tighten the connections further. If the existing supply lines are old or damaged, it is recommended to replace them with new ones.
Testing and Final Inspection: After connecting all the plumbing, thoroughly test the sink for leaks. Run both hot and cold water and check all connections for any signs of leakage. Examine the sink installation to ensure it is secure and level. Make any necessary adjustments to prevent leaks or instability.
Following these steps carefully will enable a successful kitchen sink installation. It emphasizes preparation, meticulous execution, and adherence to safety precautions. If any unforeseen difficulties arise or uncertainties persist, consulting a qualified plumber is the recommended course of action.
Once the new kitchen sink is installed and all connections are deemed secure, a sense of accomplishment should accompany the functional improvement it brings to the kitchen. The renewed ease of dishwashing and food preparation contributes significantly to a more efficient and enjoyable kitchen environment.
The careful selection of a high-quality sink, coupled with a precise installation, ensures lasting performance and prevents future plumbing issues. Investing time and attention to detail during the installation process translates to long-term satisfaction and reduces the likelihood of costly repairs down the line.

Upgrade Your Kitchen Sink Diy Replacement

Simple Steps To Install A Kitchen Sink Basin Lesso Blog

What Is The Best Way To Install Kitchen Sink Heartland Plumbing

How To Install A Drop In Kitchen Sink

Installing A New Sink 11 Things To Watch Out For Family Handyman

How To Replace A Kitchen Sink The Home

How To Install A Drop In Kitchen Sink Lowe S

How To Replace A Kitchen Sink The Home

How To Install A Kitchen Sink Into Worktop

Simple Steps To Install A Kitchen Sink Basin Lesso Blog
See Also