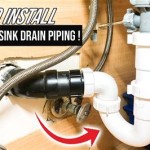
How To Install Pipes Under Kitchen Sink
Installing pipes under a kitchen sink may seem like a daunting task, but with the right tools and instructions, it can be a manageable DIY project. By following these step-by-step instructions, you can ensure a secure and functional plumbing system.
Step 1: Gather Necessary Materials
Before starting, gather the following materials:
- Two adjustable wrenches
- Plumber's putty
- Teflon tape
- New sink drain pipe
- New water supply lines
- P-trap
- Sink strainer
- Bucket
Step 2: Turn Off Water Supply
Locate the water shut-off valves under the sink and turn them clockwise to close them. Turn on the kitchen faucet and wait for the water to stop flowing, indicating that the water supply is turned off.
Step 3: Detach Old Drain Pipe
Place the bucket under the sink to catch any water that may spill. Use the adjustable wrench to loosen the nuts connecting the old sink drain pipe to the P-trap and the tailpiece on the sink. Remove the old drain pipe.
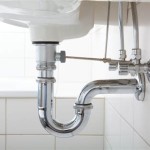
Step 4: Install P-trap
Apply a thin layer of plumber's putty around the base of the P-trap. Insert the P-trap into the drain hole in the sink and hand-tighten the slip nuts that connect the P-trap to the sink flange. Use the adjustable wrench to further tighten the nuts.
Step 5: Install New Drain Pipe
Apply Teflon tape to the threads of the new sink drain pipe. Insert the pipe into the P-trap and hand-tighten the slip nut. Use the adjustable wrench to fully tighten the nut.
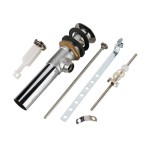
Step 6: Install Sink Strainer
Place the sink strainer over the drain hole in the sink and push down to secure it.
Step 7: Install Water Supply Lines
Apply Teflon tape to the threads of the new water supply lines. Connect the cold water line to the cold water shut-off valve and the hot water line to the hot water shut-off valve. Hand-tighten the connections and then use the adjustable wrench to fully tighten them.
Step 8: Reconnect Water Supply
Turn on the water shut-off valves under the sink to restore the water supply. Check for leaks around all the connections and tighten any loose nuts if necessary.
Step 9: Test Sink
Turn on the kitchen faucet and let the water run for a few minutes. Inspect all the connections for leaks and make sure the water drains smoothly.
Tips:
- Use a flashlight to inspect for leaks under the sink.
- If you encounter any difficulties, don't hesitate to call a licensed plumber.
- Regularly check the pipes and connections under your sink for any signs of leaks or damage.

How To Connect A Kitchen Sink Drain 2024

Kitchen Sink Plumbing How To Make A Drain Better

How To Connect A Kitchen Sink Drain

How To Install The Kitchen Sink Drain Pipes Youtube

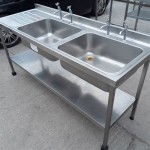
How To Install Dual Kitchen Sink Drain Plumbing Pipes

How To Plumb A Drain Sink Pipes Youtube

How To Install Kitchen Sink Drain For Beginners

How To Install A Kitchen Sink Drain

Kitchen Sink Plumbing How To Make A Drain Better

Kitchen Sink Drainage Step By Youtube