How To Put In A New Kitchen Sink
Replacing a kitchen sink is a relatively simple plumbing project that can be completed in a few hours. By following these steps, you can save yourself the cost of hiring a plumber and have a new sink installed in no time.
1. Gather your materials. You will need the following materials to replace your kitchen sink:
- New kitchen sink
- Sink strainer
- Faucet
- Plumber's putty
- Teflon tape
- Adjustable wrench
- Phillips head screwdriver
- Putty knife
- Bucket
- Sponge
2. Turn off the water supply. The first step is to turn off the water supply to your sink. You can do this by locating the shut-off valves under the sink and turning them clockwise. Once the water is turned off, open the faucet to release any remaining water from the lines.
3. Disconnect the old sink. Once the water is turned off, you can begin disconnecting the old sink. Start by disconnecting the faucet from the water supply lines. To do this, use an adjustable wrench to loosen the nuts that connect the lines to the faucet. Once the nuts are loose, you can remove the lines from the faucet.
Next, you need to disconnect the drain from the sink. To do this, place a bucket under the drain and loosen the nuts that connect the drain to the sink. Once the nuts are loose, you can remove the drain from the sink.
Finally, you need to remove the old sink from the countertop. To do this, use a putty knife to carefully cut away the plumber's putty that is holding the sink in place. Once the putty is removed, you can lift the sink out of the countertop.
4. Clean the countertop. Once the old sink is removed, you need to clean the countertop. Use a sponge and soapy water to remove any dirt or debris from the countertop. Once the countertop is clean, you can begin installing the new sink.
5. Install the new sink. To install the new sink, first apply a bead of plumber's putty around the rim of the sink. Then, carefully place the sink into the countertop and press down firmly. Once the sink is in place, use an adjustable wrench to tighten the nuts that connect the sink to the countertop.
6. Connect the faucet. To connect the faucet, first wrap the threads of the faucet with Teflon tape. Then, screw the faucet into the water supply lines. Once the faucet is hand-tight, use an adjustable wrench to tighten it further.
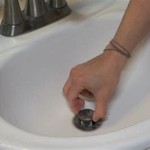
7. Connect the drain. To connect the drain, first apply a bead of plumber's putty around the rim of the drain. Then, carefully place the drain into the sink and press down firmly. Once the drain is in place, use an adjustable wrench to tighten the nuts that connect the drain to the sink.
8. Turn on the water supply. Once the faucet and drain are connected, you can turn on the water supply. Slowly open the shut-off valves under the sink and check for any leaks. If there are any leaks, tighten the nuts on the faucet or drain until the leaks stop.
9. Enjoy your new sink! Once the sink is installed and there are no leaks, you can start using your new sink. Be sure to clean the sink regularly to keep it looking its best.

Upgrade Your Kitchen Sink Diy Replacement

How To Install A Drop In Kitchen Sink

How To Replace A Kitchen Sink The Home

How To Upgrade Your Kitchen Sink At Home With Ashley

How To Replace A Kitchen Sink The Home

How To Replace And Install An Undermount Sink

How To Replace A Tiled In Kitchen Sink Without Damaging Tile

How To Replace A Kitchen Sink Part 3 Fitting Your New

How To Upgrade Your Kitchen Sink At Home With Ashley

How To Replace A Kitchen Sink The Home