How To Repair a Cracked Porcelain Sink
Porcelain sinks, prized for their smooth, glossy finish and durability, are common fixtures in bathrooms and kitchens. Despite their inherent strength, porcelain sinks are susceptible to cracking due to impacts, thermal stress, or settling foundations. A crack in a porcelain sink, even a hairline fracture, can detract from its aesthetic appeal and, more critically, lead to further damage, including water damage and structural instability. Fortunately, minor cracks in porcelain sinks can often be repaired effectively using readily available materials and straightforward techniques. This article provides a comprehensive guide on how to repair a cracked porcelain sink, ensuring a sound and aesthetically pleasing result.
Before embarking on any repair, it is crucial to accurately assess the extent of the damage. Hairline cracks, which appear as fine lines on the surface, are usually the easiest to repair. More significant cracks, particularly those that penetrate the porcelain entirely or exhibit chipping, may require more extensive repair procedures. It is also important to determine the cause of the crack, as addressing the underlying issue can prevent future recurrence. For instance, if the crack resulted from impact, steps may be taken to protect the sink from further accidental damage. If the crack appears to be related to building movement, consulting with a structural engineer may be advisable.
Key Considerations Before Starting the Repair
Several factors influence the success and longevity of a porcelain sink repair. First, the correct selection of materials is paramount. Epoxy-based fillers and repair kits specifically designed for porcelain are generally the most effective. These materials offer strong adhesion, durability, and resistance to water and cleaning agents. Second, proper surface preparation is essential for achieving a strong bond between the repair material and the existing porcelain. Thorough cleaning, drying, and roughening of the crack area are necessary steps. Finally, patience and attention to detail are critical. Rushing the repair process can lead to unsatisfactory results and the need for rework. It is advisable to allocate sufficient time for each step, allowing materials to cure properly and ensuring smooth and seamless blending of the repaired area with the surrounding surface.
The color matching is also a crucial consideration. Porcelain comes in various shades, and a perfect match is essential for an inconspicuous repair. Many repair kits include tinting agents that allow for custom color blending. It is recommended to test the color on a small, inconspicuous area of the sink before applying it to the crack. If a perfect match is unattainable, opting for a slightly lighter shade is often preferable, as it will be less noticeable than a darker shade. Remember to document the original color mixing proportions for future reference or touch-ups.
Safety is another vital aspect of the repair process. When working with chemicals, such as epoxy resins and solvents, it is important to wear appropriate protective gear, including gloves, eye protection, and a respirator, especially in a poorly ventilated area. Read and follow the manufacturer's safety instructions for each product used. Keep children and pets away from the work area to prevent accidental exposure to harmful substances. Proper disposal of used materials, such as sandpaper and mixing containers, is also necessary to avoid environmental contamination.
Step-by-Step Repair Process
The repair process typically involves the following steps:
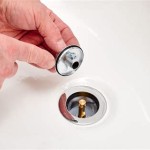
- Cleaning: Begin by thoroughly cleaning the area around the crack. Use a mild detergent and warm water to remove any dirt, grease, or soap scum. Rinse the area well and allow it to dry completely. For stubborn stains, a mild abrasive cleaner, such as baking soda paste, may be used, but exercise caution to avoid scratching the porcelain surface.
- Etching (Optional but Recommended): Roughening the surface slightly will improve the adhesion of the repair material. Use fine-grit sandpaper (e.g., 220-grit or higher) to gently sand the area around the crack. Focus on creating a slightly textured surface without removing the porcelain’s finish excessively. The sanding should extend about ½ to 1 inch beyond the crack on all sides.
- Preparing the Repair Material: Follow the manufacturer's instructions to prepare the epoxy-based filler or repair kit. This usually involves mixing two components in the correct proportions. Mix thoroughly to ensure a homogenous mixture. If color matching is required, add tinting agents gradually until the desired color is achieved. Remember to work quickly, as epoxy resins typically have a limited working time (pot life).
- Applying the Filler: Using a small spatula or applicator, carefully apply the filler to the crack, ensuring that it penetrates all crevices and fills the crack completely. Avoid applying excess filler, as this will require more sanding later. For deep cracks, it may be necessary to apply the filler in thin layers, allowing each layer to cure before applying the next. Overfill slightly to allow for sanding back to level with the original surface.
- Curing: Allow the filler to cure completely according to the manufacturer's instructions. Curing times can vary depending on the product and ambient temperature. Avoid disturbing the repaired area during the curing process. Shielding the area from excessive dust or debris is recommended.
- Sanding: Once the filler has cured completely, use fine-grit sandpaper to sand the repaired area smooth. Start with a slightly coarser grit (e.g., 400-grit) and gradually progress to finer grits (e.g., 600-grit, 800-grit, and finally 1000-grit or higher) to achieve a smooth, polished finish. Wet sanding is generally recommended, as it helps to prevent clogging of the sandpaper and produces a smoother result. Use a sanding block to ensure even pressure and avoid creating uneven surfaces.
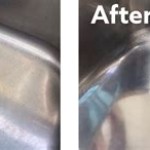
- Polishing (Optional): For a high-gloss finish, consider polishing the repaired area with a polishing compound designed for porcelain or ceramics. Apply the polishing compound to a soft cloth or polishing pad and buff the surface until the desired shine is achieved.
- Cleaning and Sealing (Optional): Clean the repaired area with a mild detergent and water to remove any sanding dust or polishing compound residue. A sealant specifically designed for porcelain can be applied to help protect the repair and prevent future damage.
Dealing with More Complex Cracks
While the above steps are suitable for hairline cracks and minor damage, more extensive cracking may require additional techniques. For instance, if a chip of porcelain is missing, it may be necessary to use a mold or form to support the filler while it cures. A piece of tape or clay can be used to create a temporary mold around the missing area. For large cracks that extend through the entire thickness of the porcelain, reinforcing the back of the sink with fiberglass cloth and epoxy resin can add strength and stability.
Cracks that are actively widening or showing signs of significant structural damage may require professional repair or even sink replacement. Ignoring these issues can lead to more costly repairs in the long run and potentially pose a safety hazard. Consult with a qualified plumbing contractor or porcelain repair specialist to assess the damage and recommend the appropriate course of action.
Preventative measures can help minimize the risk of future cracks. Avoid dropping heavy objects into the sink and protect it from impacts. Be mindful of sudden temperature changes, as extreme temperature fluctuations can cause thermal stress that leads to cracking. Regularly inspect the sink for any signs of damage and address minor issues promptly before they escalate. Properly supporting the sink during installation and ensuring a stable foundation can also help to prevent stress cracks.
In conclusion, repairing a cracked porcelain sink is a manageable task that can be accomplished with careful preparation, the appropriate materials, and meticulous execution. By following the steps outlined above and taking preventative measures, it is possible to restore the sink to its original condition and prolong its lifespan. If the damage is extensive or there are concerns about structural integrity, seeking professional assistance is always the best course of action.

How To Fix A Crack In Porcelain Sink Youtube

How To Patch A Porcelain Sink Crack Himg Surface Repair

How To Fix A Hole In Vintage Porcelain Sink Hometalk

How To Fix A Chipped Porcelain Sink

How To Fix A Ceramic Or Porcelain Sink 6 Simple Diy Steps

How To Fix A Cracked Porcelain Sink 8 Steps Prudent Reviews

How To Fix A Cracked Porcelain Sink 8 Steps Prudent Reviews

I Have A Huge Crack In My Porcelain Sink What S The Best Way To Fix Hometalk

Magic 0 17 Oz Porcelain Chip Fix Repair For Tubs And Sinks 3007a

How To Fix A Hairline Crack In The Vanit Bunnings Work Community