How To Replace A Sink Sprayer
A kitchen sink sprayer is a convenient tool that makes it easy to clean dishes, rinse food, and fill pots and pans. However, over time, sink sprayers can become worn out, clogged, or damaged, and need to be replaced.
Replacing a sink sprayer is not a difficult task that can be completed by most homeowners in an hour or less. The following step-by-step guide will show you how to replace a sink sprayer.
Materials you will need:
- New sink sprayer
- Adjustable wrench
- Phillips screwdriver
- Pliers (optional)
- Plumber's putty (optional)
Step-by-Step Instructions:
1. Turn off the water supply to the sink. There should be two shut-off valves under the sink, one for the hot water and one for the cold water. Turn both valves clockwise to turn off the water.
2. Disconnect the water supply lines from the old sprayer. Use an adjustable wrench to loosen the nuts that connect the water supply lines to the sprayer. Once the nuts are loose, you can disconnect the water supply lines by hand.
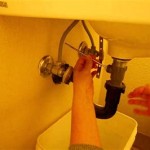
3. Remove the mounting nut that holds the sprayer in place. The mounting nut is usually located underneath the sink. Use an adjustable wrench to loosen the mounting nut and remove it by hand.
4. Pull the old sprayer out of the sink. Once the mounting nut is removed, you can pull the old sprayer out of the sink.
5. Apply plumber's putty to the base of the new sprayer (optional). Plumber's putty is a sticky substance that helps to seal the new sprayer in place and prevent leaks. Apply a small bead of plumber's putty around the base of the new sprayer.
6. Insert the new sprayer into the sink. Align the new sprayer with the hole in the sink and insert it into the hole. Make sure that the plumber's putty is sealing the gap between the sprayer and the sink.
7. Tighten the mounting nut. Use an adjustable wrench to tighten the mounting nut until it is snug. Do not overtighten the mounting nut, as this could damage the sprayer.
8. Connect the water supply lines to the new sprayer. Use an adjustable wrench to tighten the nuts that connect the water supply lines to the sprayer. Make sure that the nuts are tight enough to prevent leaks, but do not overtighten them.
9. Turn on the water supply to the sink. Open both shut-off valves under the sink to turn on the water supply. Check for leaks around the new sprayer. If you find any leaks, tighten the mounting nut or the nuts that connect the water supply lines until the leaks stop.
10. Test the new sprayer. Turn on the sprayer and check to make sure that it is working properly. The water should spray out of the nozzle in a steady stream.

How To Change A Kitchen Sink Spray

How To Replace A Broken Kitchen Sink Sprayer Exquisitely Unremarkable

How To Replace A Kitchen Sink Sprayer Faucet Attachment

How To Replace Your Pull Out Sink Sprayer But Not The Hose Youtube

How To Fix A Sink Sprayer Leaking In The Kitchen Full Guide

How To Replace A Sink Sprayer The Home

Replace A Sink Sprayer

Ask A Plumber Sink Sprayer Repair

How To Replace A Sink Sprayer The Home

How To Replace A Broken Kitchen Sink Sprayer Exquisitely Unremarkable