How To Replace Sink Faucet
Replacing a sink faucet is a relatively simple plumbing repair that can be completed in a few hours. By following these step-by-step instructions, you can save yourself the cost of hiring a plumber.
Tools and Materials
Before you begin, gather the following tools and materials:
- New sink faucet
- Adjustable wrench
- Basin wrench
- Pliers
- Screwdriver
- Teflon tape
- Plumber's putty
Step-by-Step Instructions
Step 1: Turn off the water supply.
Under the sink, locate the two shut-off valves that control the water supply to the faucet. Turn both valves clockwise to turn off the water. If there are no shut-off valves, you will need to turn off the main water supply to your home.
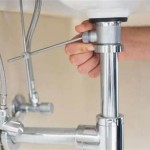
Step 2: Disconnect the old faucet.
Use the adjustable wrench to loosen the nuts that hold the water supply lines to the faucet. Once the nuts are loose, you can disconnect the water supply lines by hand. Next, use the basin wrench to loosen the nuts that hold the faucet to the sink. Once the nuts are loose, you can lift the old faucet out of the sink.
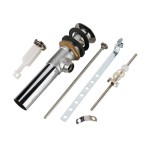
Step 3: Prepare the new faucet.
Wrap a few layers of Teflon tape around the threads of the new faucet's water supply lines. This will help to create a watertight seal. Apply a thin bead of plumber's putty to the underside of the faucet's base.
Step 4: Install the new faucet.
Insert the new faucet into the sink and tighten the nuts that hold it in place. Use the adjustable wrench to tighten the nuts on the water supply lines. Do not overtighten the nuts, as this can damage the faucet.
Step 5: Reconnect the water supply.
Hand-tighten the water supply lines to the new faucet. Use the adjustable wrench to tighten the nuts on the water supply lines. Do not overtighten the nuts, as this can damage the water supply lines.
Step 6: Turn on the water supply.
Slowly turn on the shut-off valves under the sink to turn on the water supply to the faucet. Check for leaks around the base of the faucet and the water supply lines. If you find any leaks, tighten the nuts until the leaks stop.
Step 7: Test the faucet.
Turn on the faucet and check for proper operation. The water pressure should be consistent and the faucet should not leak. If you experience any problems, check the connections for leaks and tighten the nuts accordingly.
Congratulations! You have now successfully replaced your sink faucet.

How To Replace A Kitchen Sink Faucet Youtube

Diy How To Replace And Install A Bathroom Sink Faucet

How To Replace A Kitchen Faucet

How To Replace A Bathroom Faucet Removal And Installation

How To Change A Kitchen Faucet Family Handyman

How To Replace A Kitchen Faucet Young House Love

How To Replace A Kitchen Faucet Youtube

How To Replace A Bathroom Faucet Home Repair Tutor

How To Replace A Kitchen Faucet For Newbies Anika S Diy Life

How To Replace A Sink Faucet The Stonybrook House