How To Secure Undermount Sink To Granite
Undermount sinks are a popular choice for modern kitchens. They offer a sleek, seamless look that can enhance the aesthetics of any space. However, installing an undermount sink can be a challenging task, especially when working with granite countertops. In this article, we will provide a step-by-step guide on how to secure an undermount sink to granite countertops, ensuring a durable and professional-looking installation.
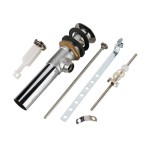
Materials and Tools Required:
- Undermount sink
- Granite countertops
- Sink mounting clips
- Silicone caulk
- Caulk gun
- Level
- Measuring tape
- Drill
- Screwdriver
- Safety glasses
Step-by-Step Instructions:
1. Prepare the Granite Countertops:
Begin by cleaning the granite countertops thoroughly to remove any dust or debris. Use a mild cleaner and a soft cloth, avoiding harsh chemicals that could damage the surface. Once the countertops are clean, use a measuring tape and level to mark the desired location for the sink. Transfer these markings to the underside of the granite and draw a template for the sink cutout.
2. Cut the Granite Countertops:
Using a diamond-tipped drill bit and a jigsaw, carefully cut along the template on the underside of the granite. Wear safety glasses during this process. Remove the cutout section and inspect the edges for any unevenness. If necessary, use a grinder to smooth the edges and ensure a snug fit for the sink.
3. Install the Sink Mounting Clips:
Position the undermount sink on the granite cutout and determine the locations for the mounting clips. These clips will hold the sink securely in place. Typically, clips are placed along the perimeter of the sink, about 6-8 inches apart. Use a drill to create pilot holes for the mounting clips and install them using the provided screws.
4. Apply Silicone Caulk:
Apply a generous bead of silicone caulk around the perimeter of the sink cutout, both on the granite surface and the underside of the sink. Use a caulk gun to ensure a consistent and even application. Smooth out the caulk with a wet finger or a putty knife, creating a watertight seal.
5. Set the Sink in Place:
Carefully lift the undermount sink and align it with the cutout. Gently lower the sink into place, ensuring that it fits snugly against the granite surface. Press down firmly around the edges to ensure proper adhesion between the caulk and the surfaces.
6. Secure the Sink:
Tighten the mounting clips using a screwdriver to lock the sink in position. Start with the end clips and gradually work your way towards the center, ensuring equal pressure is applied to all the clips. Check the level of the sink to ensure it is level from side to side and front to back.
7. Clean Up Excess Caulk:
Remove any excess caulk that may have squeezed out during the installation process. Use a damp cloth or a razor blade to trim and smooth the caulk, leaving a clean and professional-looking finish.
Additional Tips:

How To Install An Undermount Kitchen Sink On A Granite Countertop Youtube

Undermount Sink Install Granite Countertop Diy Episode 11 Youtube

Undermount Sink Installation Tool Set

How To Install An Undermount Sink

How To Install An Undermount Sink In Granite Mounting 7 Steps

Diy Easy Undermount Sink Install

How To Install Undermount Kitchen Sinks Concrete Countertop Institute

Installing Undermount Sink Clips Granite Quartz Countertop

How To Install Undermount Sink In Granite Stud And Clip Method

How Do You Install Undermount Sinks Marble Com