How To Take The Drain Out Of A Sink
Removing a sink drain is a task often necessitated by repairs, replacement, or upgrades to plumbing fixtures. Whether you are dealing with a clogged drain, installing a new sink, or simply performing routine maintenance, understanding the proper procedure is essential to avoid damage to the sink, plumbing, and personal injury. This article provides a detailed, step-by-step guide on how to safely and effectively remove a sink drain.
Before commencing any work, it is crucial to gather the necessary tools and materials. Proper preparation will streamline the process and minimize potential complications. Neglecting this preliminary step can result in unforeseen delays and increased frustration. Essential items include:
- Channel-lock pliers
- Basin wrench (also known as a sink wrench)
- Adjustable wrench
- Flathead screwdriver
- Penetrating oil (e.g., WD-40)
- Bucket or basin
- Rags or towels
- Protective eyewear
- Gloves
Moreover, it is highly recommended to have a helper available, especially if the sink is heavy or difficult to maneuver. A second pair of hands can provide additional support and stability, preventing accidental drops or injuries. Safety should always be prioritized, and assistance can significantly mitigate potential risks.
Prior to physically disconnecting the drain, ensure the water supply to the sink is completely shut off. Underneath the sink, locate the hot and cold water shut-off valves. Turn each valve clockwise until it is fully closed. Test the faucet to confirm that the water flow has ceased. This step is paramount to prevent flooding and water damage during the drain removal process.
Once the water supply is secured, clear the area beneath the sink. Remove any items that might obstruct your access to the drain assembly. This typically includes cleaning supplies, storage containers, or personal belongings. A clear workspace allows for greater maneuverability and reduces the likelihood of tripping or bumping into objects.
Loosening the Drain Assembly
The initial step in physically removing the drain involves loosening the various components that secure it to the sink and plumbing. This often requires the application of penetrating oil to corroded or stuck connections. Apply a generous amount of penetrating oil to the threads of the slip nuts, locknuts, and any other connections that appear difficult to loosen. Allow the oil to soak for at least 15-30 minutes to effectively penetrate the corrosion.
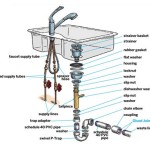
Begin by disconnecting the P-trap, the curved section of pipe located directly beneath the sink drain. Place a bucket or basin beneath the P-trap to catch any remaining water. Loosen the slip nuts on either side of the P-trap using channel-lock pliers. Turn the nuts counterclockwise. If the nuts are particularly stubborn, apply more penetrating oil and allow it to soak further. Once the nuts are loosened, carefully remove the P-trap.
Next, address the tailpiece, the section of pipe that connects the sink drain to the P-trap. Similar to the P-trap, loosen the slip nut that connects the tailpiece to the drain body using channel-lock pliers. Carefully remove the tailpiece. Ensure that all associated washers and gaskets are retained, as they may be needed if the drain is to be reinstalled.
Removing the Drain Flange
The drain flange is the uppermost part of the drain assembly, located inside the sink basin. It is typically secured by a large locknut underneath the sink. Accessing and removing this locknut can be challenging, often requiring the use of a basin wrench. The basin wrench is designed to grip and turn nuts in hard-to-reach locations.
Position the basin wrench beneath the sink, engaging the jaws of the wrench onto the locknut. Ensure the wrench is securely gripping the nut before applying force. Turn the wrench counterclockwise to loosen the locknut. Depending on the age and condition of the drain, considerable force may be required. If the nut is severely corroded, apply additional penetrating oil and allow it to soak before attempting to loosen it further.
As the locknut loosens, use one hand to hold the drain flange inside the sink basin to prevent it from spinning. Continue turning the locknut until it is completely removed. Once the locknut is off, carefully push the drain flange upward from beneath the sink. It may be necessary to gently tap the flange with a rubber mallet to dislodge it if it is stuck.
With the locknut removed, the drain flange can be lifted out of the sink basin. Inspect the flange and surrounding area for any remaining sealant or plumber's putty. Use a putty knife or similar tool to carefully scrape away any residue. Clean the area thoroughly to ensure a smooth surface for the new drain installation, if applicable.
Dealing with Specialized Drains
While the general procedure outlined above applies to most standard sink drains, some sinks may feature specialized drains that require a slightly different approach. For example, pop-up drains, commonly found in bathroom sinks, have a linkage mechanism that must be disconnected before the drain flange can be removed.
To remove a pop-up drain, locate the pivot rod beneath the sink. This rod connects the pop-up stopper to the drain lever. Disconnect the pivot rod from the drain lever by either unscrewing a retaining nut or releasing a clip. Once the pivot rod is disconnected, the pop-up stopper can be removed from the drain flange inside the sink basin. With the stopper and linkage mechanism removed, the drain flange can be loosened and removed as described previously.
Similarly, some kitchen sinks may feature garbage disposals connected to the drain assembly. Removing a sink drain in this case requires first disconnecting the garbage disposal. Consult the garbage disposal's instruction manual for specific disconnection procedures. Generally, this involves unplugging the disposal, disconnecting the drain lines, and then releasing the mounting assembly that secures the disposal to the sink.
In situations where the drain assembly is severely corroded or damaged, it may be necessary to cut the drain pipes to facilitate removal. This should be considered a last resort, as it involves more extensive plumbing repairs. If pipe cutting is required, use a pipe cutter or hacksaw to carefully cut the drain pipes as close to the drain body as possible. Ensure that the cut is clean and smooth to facilitate the installation of new fittings.
After successfully removing the sink drain, thoroughly inspect the surrounding area for any signs of damage or deterioration. Check the sink opening for cracks or chips. Examine the plumbing connections for leaks or corrosion. Address any issues promptly to prevent future problems. Dispose of the old drain assembly responsibly and clean up the workspace.

5 Natural Ways To Unclog A Bathroom Sink Hiller How

How To Remove A Kitchen Sink Drain 13 Steps With Pictures

How To Clean Out A Sink Pop Up Drain Stopper Youtube

How To Remove A Kitchen Sink Drain 13 Steps With Pictures

How To Remove A Bathroom Sink Pop Up Stopper

Sink Maintenance How Do I Remove A Pop Up Drain

Bathroom How Do I Get The Popup Drain Plug Out Of Sink Home Improvement Stack Exchange

How To Replace A Rusty Sink Drain Howtolou Com

Plumbing How Do I Remove The Sink Drain In This Situation Home Improvement Stack Exchange

How To Unclog Clean A Bathroom Sink Drain 3 Methods


