How To Unscrew Sink Pipes: A Comprehensive Guide
Maintaining a functioning sink is crucial for any household or commercial space. A common task in plumbing maintenance is unscrewing sink pipes, whether for repairs, replacements, or cleaning. This process, while seemingly simple, requires the appropriate tools, understanding of pipe construction, and a systematic approach to avoid damage and potential leaks. This article provides a comprehensive guide on how to safely and effectively unscrew sink pipes.
Before commencing any plumbing work, safety is paramount. Shutting off the water supply is the first and most critical step. Locate the shut-off valves under the sink, typically one for hot water and one for cold water. Turn both valves clockwise until they are completely closed. Test the faucet to ensure the water flow has stopped entirely. If the shut-off valves are not functioning or are difficult to access, the main water supply to the building may need to be turned off. Consider wearing safety glasses to protect the eyes from debris or splashes. Also, place a bucket or container under the pipes being worked on to catch any residual water that may be trapped within the system.
Identifying Sink Pipe Components
Understanding the different components of a sink's plumbing system is essential before attempting to unscrew any pipes. The common parts include:
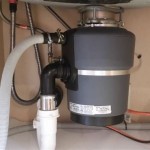
Tailpiece: This is the vertical pipe that connects directly to the sink drain. It extends downwards from the sink basin.
P-trap: This is the curved pipe located beneath the tailpiece, designed to hold water and prevent sewer gases from entering the building. The P-trap assembly typically includes threaded connections and slip nuts.
Drainpipe: This pipe extends from the P-trap to the wall drain, carrying wastewater away. It may be connected to the P-trap via a threaded connection, slip nut, or a clamped joint.
Slip Nuts: These are specialized nuts used to connect sections of drain pipe. They are designed to be hand-tightened but may require gentle tool assistance. Associated with each slip nut is a plastic or rubber slip joint washer, which creates a watertight seal between the pipes when the nut is tightened.
Threaded Connections: Some pipes are connected using standard threaded connections. These require tightening with a wrench, often with Teflon tape applied to the threads to create a watertight seal.
Fittings: These include elbows, couplings, and tees, used to connect pipes at different angles or to branch off the main drain line. These fittings can be connected using threaded connections, slip nuts, or solvent welding (for PVC pipes).
Essential Tools for Unscrewing Sink Pipes
Having the right tools is crucial for a successful and damage-free pipe unscrewing process. Here are some essential tools:
Adjustable Wrench: An adjustable wrench, also known as a crescent wrench, is indispensable for loosening and tightening threaded connections. Its adjustable jaws allow it to fit various nut and pipe sizes.
Pipe Wrench: A pipe wrench is designed for gripping and turning cylindrical objects like pipes and fittings. It has serrated jaws that provide a strong grip, but care must be taken to avoid damaging soft pipe materials.
Basin Wrench: A basin wrench is specifically designed for accessing hard-to-reach nuts behind sinks and under cabinets. It features a long handle and a pivoting jaw that can grip nuts at various angles.
Channel-Lock Pliers: These pliers, also known as tongue-and-groove pliers, offer a wide range of adjustable jaw openings and provide a secure grip for loosening or tightening nuts and fittings.
Plumber's Tape (Teflon Tape): Plumber's tape, also known as Teflon tape or PTFE tape, is used to create a watertight seal on threaded connections. It is wrapped around the threads of the pipe before connecting it to another fitting.
Penetrating Oil: Penetrating oil, such as WD-40 or Liquid Wrench, can be used to loosen corroded or stuck nuts and fittings. It helps break down rust and grime, making it easier to unscrew the pipes.
Bucket and Rags: A bucket is necessary to catch any water that may be trapped in the pipes. Rags are useful for cleaning up spills and wiping down pipe surfaces.
Step-by-Step Guide to Unscrewing Sink Pipes
Following a systematic approach is crucial when unscrewing sink pipes. This minimizes the risk of damage and ensures a successful outcome. The following steps outline a general procedure for most sink pipe configurations:
Preparation: Begin by shutting off the water supply to the sink as previously described. Place a bucket underneath the pipes to catch any remaining water. Put on safety glasses.
Loosening Slip Nuts: If the pipes are connected with slip nuts, start by loosening these. Position a wrench around the slip nut and gently turn it counterclockwise. Avoid over-tightening the wrench, as this can damage the nut. If the slip nut is stuck, apply penetrating oil and allow it to sit for several minutes before attempting to loosen it again. Once the slip nut is loose, carefully slide it up or down the pipe to create space for disassembly. If the slip nut refuses to budge, try using channel-lock pliers to get a better grip, but exercise caution to avoid crushing the nut.
Disconnecting the Tailpiece: The tailpiece is usually connected to the sink drain flange by a large nut. Using an adjustable wrench or channel-lock pliers, loosen this nut by turning it counterclockwise. Once loose, carefully detach the tailpiece from the drain flange. Be prepared for water to spill out. Inspect the rubber or plastic washer between the tailpiece and the drain flange. If it is worn or damaged, replace it with a new one before reassembling.
Removing the P-trap: The P-trap is typically connected to the tailpiece and the drainpipe via slip nuts. Loosen the slip nuts connecting the P-trap to these pipes. Once both slip nuts are loose, carefully remove the P-trap assembly. Be aware that the P-trap holds water, so keep the bucket positioned underneath to catch any spillage. Examine the P-trap for any clogs or debris. Clean it thoroughly before reassembling.
Disconnecting the Drainpipe: The drainpipe connects the P-trap to the wall drain. Depending on the configuration, it may be connected with a slip nut, a threaded connection, or a clamped joint. If it's a slip nut connection, loosen the slip nut as described earlier. If it's a threaded connection, use an adjustable wrench or pipe wrench to turn the pipe counterclockwise, carefully breaking the seal. If it's a clamped joint, loosen the clamp with a screwdriver or wrench and carefully pull the pipe apart. It may be necessary to use penetrating oil to loosen any corroded connections. Note the type of connection and the order of disassembly for easy reassembly.
Dealing with Threaded Connections: Threaded connections can sometimes be difficult to unscrew, especially if they are corroded or have been sealed with pipe dope or Teflon tape. Before attempting to unscrew a threaded connection, apply penetrating oil to the threads and allow it to soak in for several minutes. Use an adjustable wrench or pipe wrench to grip the fitting securely. Apply steady pressure and turn the fitting counterclockwise. If the fitting is extremely stubborn, try applying heat with a heat gun or hair dryer to expand the metal slightly. Be careful not to overheat the fitting, as this can damage it or nearby materials. If all else fails, consider cutting the pipe with a pipe cutter and replacing the affected section.
Addressing Stubborn Connections: Occasionally, pipes will be severely corroded or seized, making them extremely difficult to unscrew. In such cases, several techniques can be employed. Apply penetrating oil liberally and allow it ample time to work. Gentle tapping with a hammer around the connection point can help break the corrosion. Using two wrenches, one to hold the pipe steady and the other to turn the nut, can provide additional leverage. If these methods fail, cautiously apply heat using a propane torch or heat gun. The heat can help expand the metal and loosen the connection. Exercise extreme caution when using heat near flammable materials and ensure adequate ventilation. As a last resort, consider cutting the pipe and replacing the affected section. This often requires more extensive plumbing knowledge and may necessitate professional assistance.
Inspecting and Cleaning: Once the pipes are disassembled, inspect them thoroughly for any signs of damage, corrosion, or wear. Replace any damaged pipes or fittings. Clean the pipes to remove any accumulated debris or buildup. A wire brush or pipe cleaner can be used to scrub the inside of the pipes. Flush the pipes with water to remove any remaining particles. Pay particular attention to the P-trap, as it is prone to collecting debris. Clean the sink drain flange and replace the rubber or plastic washer if necessary.
Reassembling the Sink Pipes
After completing the necessary repairs or cleaning, reassembly is the next step. Ensure all components are clean and in good condition before proceeding. Reassembly typically involves reversing the disassembly process, but attention to detail is critical for a leak-free result.
Applying Teflon Tape: For threaded connections, apply Teflon tape to the male threads before connecting the pipes. Wrap the tape clockwise around the threads, overlapping each layer slightly. Apply several layers of tape to ensure a good seal. Do not over-tighten the connection, as this can strip the threads or damage the fitting.
Tightening Slip Nuts: When reassembling slip nut connections, ensure the slip joint washers are properly seated. Slide the slip nut over the pipe and tighten it by hand until it is snug. Then, use a wrench to tighten it slightly more, but avoid over-tightening. Overtightening can damage the washer or the slip nut. Periodically check for leaks while running water through the sink.
Checking for Leaks: After reassembling the pipes, turn on the water supply slowly and check for leaks at all connections. If a leak is detected, tighten the connection slightly until the leak stops. If the leak persists, disassemble the connection, inspect the components for damage, and reassemble it with fresh Teflon tape or a new slip joint washer. It is important to address any leaks promptly to prevent water damage and further plumbing problems.
By following these steps and utilizing the appropriate tools, unscrewing and reassembling sink pipes can be a manageable task. However, if encountering complex plumbing issues or lacking confidence in performing the work, it is advisable to consult a qualified plumber.

How To Remove A Kitchen Sink Drain 13 Steps With Pictures

How To Remove A Kitchen Sink Drain 13 Steps With Pictures

How To Unclog A Sink The Right Way

Plumbing How To Remove Rusted Remains Of Kitchen Sink Tailpiece Home Improvement Stack Exchange

Plumbing How Do I Remove The Sink Drain In This Situation Home Improvement Stack Exchange

P Trap Removal Diy Rex

Loosening The P Trap Home Remedies For Clogged Drains

How To Clean A P Trap Or U Bend 10 Steps With Pictures

How To Clean Out A Sink Trap Bailey Brothers Plumbing

How To Remove And Replace Old Kitchen Sink Drain Pipe Save Money