Kitchen Sink Basket Strainer Replacement: A Comprehensive Guide
The kitchen sink basket strainer is an essential component of any sink, preventing food particles and debris from entering the drain pipes. Over time, these strainers can corrode, crack, or simply wear out, leading to leaks and potential plumbing problems. Replacing a kitchen sink basket strainer is a relatively straightforward DIY project that can save homeowners money on plumbing services. This article provides a detailed guide on how to replace a kitchen sink basket strainer, covering the tools required, step-by-step instructions, and important considerations for a successful replacement.
Before commencing the replacement, it is important to understand the different types of kitchen sink basket strainers available. The standard strainer basket is the most common type, featuring a removable basket to catch debris. Other types include disposal flange strainers, which are specifically designed for use with garbage disposals, and deep cup strainers, which offer a larger capacity for catching debris. The choice of strainer depends on the existing setup and the homeowner's preferences.
This article focuses on the replacement process for a standard strainer basket, but the general principles apply to other types as well. The key is to understand the components of the strainer assembly and how they connect to the sink and drainpipe.
Key Point 1: Preparation and Tools
Proper preparation is crucial for a smooth and efficient replacement process. Gathering the necessary tools and materials beforehand minimizes disruptions and ensures that the job can be completed without unnecessary delays. Here's a list of essential items:
*New Kitchen Sink Basket Strainer:
Choose a replacement strainer that matches the size and type of the existing one. Measure the sink drain opening to ensure a proper fit. *Basin Wrench:
This specialized wrench is designed to reach and loosen nuts in tight spaces, particularly those located under the sink. *Pipe Wrench:
A pipe wrench may be needed to loosen or tighten drain pipes connected to the strainer. *Adjustable Wrench:
An adjustable wrench can be used for a variety of tasks, including loosening nuts and tightening connections. *Screwdriver (Phillips and Flathead):
Depending on the type of strainer and the drainpipe connections, both Phillips and flathead screwdrivers may be required. *Putty Knife or Scraper:
Used to remove old plumber's putty and sealant from the sink and strainer surfaces. *Plumber's Putty:
This pliable sealant creates a watertight seal between the strainer flange and the sink. *Towel or Bucket:
To catch any water that may spill during the replacement process. *Gloves:
To protect hands from dirt and grime. *Safety Glasses:
To protect eyes from debris. *Penetrating Oil:
If the nuts and bolts are corroded or stuck, penetrating oil can help loosen them. *Clean Rags:
For cleaning surfaces and wiping up spills.Having all these tools and materials readily available will streamline the replacement process significantly.
Key Point 2: Step-by-Step Replacement Process
The replacement process involves removing the old strainer and installing the new one. Following these steps carefully ensures a successful outcome:
1.Shut off the Water Supply:
Turn off the hot and cold water supply valves located under the sink. This prevents water from flowing into the drain during the replacement. 2.Disconnect the Drainpipe:
Loosen the slip nuts connecting the drainpipe to the tailpiece of the strainer. Use a pipe wrench or adjustable wrench to loosen the nuts. Have a bucket or towel ready to catch any water that may be trapped in the pipes. Carefully disconnect the drainpipe from the strainer. 3.Loosen the Strainer Nut:
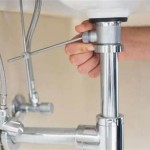
Locate the large nut that secures the strainer to the sink from underneath. This nut is typically made of metal or plastic. Use a basin wrench to loosen the nut. Applying penetrating oil to the nut beforehand may help if it is corroded or stuck. 4.Remove the Old Strainer:
Once the nut is sufficiently loosened, carefully push the strainer up from underneath the sink while holding it from above. This will separate the strainer from the sink. Remove any remaining plumber's putty or sealant from the sink opening using a putty knife or scraper. 5.Clean the Sink Opening:
Thoroughly clean the sink opening to remove any dirt, debris, or old sealant. Ensure that the surface is clean and dry before installing the new strainer. 6.Apply Plumber's Putty:
Roll a rope of plumber's putty between your hands to create a smooth, consistent strip. Apply the putty evenly around the underside of the new strainer flange. This will create a watertight seal between the strainer and the sink. 7.Install the New Strainer:
Carefully insert the new strainer into the sink opening from above. Press down firmly to ensure that the putty makes good contact with the sink surface. 8.Attach the Mounting Hardware:
From underneath the sink, slide the rubber gasket, friction ring, and mounting nut onto the strainer tailpiece. Tighten the mounting nut by hand until it is snug. 9.Align the Strainer:
Ensure that the strainer is properly aligned in the sink opening. The basket should be centered and the strainer body should be straight. 10.Tighten the Mounting Nut:
Use a basin wrench to tighten the mounting nut further. Tighten it gradually and evenly to avoid damaging the strainer or the sink. Do not overtighten the nut, as this can crack the strainer body or the sink. The goal is to create a snug and watertight seal. 11.Reconnect the Drainpipe:
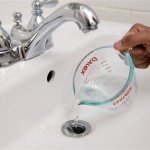
Reconnect the drainpipe to the tailpiece of the strainer. Tighten the slip nuts securely, but do not overtighten them. Ensure that the drainpipe is properly aligned and that there are no leaks. 12.Test for Leaks:
Turn on the water supply and check for leaks around the strainer flange and the drainpipe connections. If any leaks are detected, tighten the mounting nut or the slip nuts further. If the leaks persist, disassemble the strainer and inspect the putty and gaskets for damage or improper installation.Following these steps carefully will result in a properly installed and leak-free kitchen sink basket strainer.
Key Point 3: Troubleshooting and Considerations
While the replacement process is generally straightforward, some challenges may arise. Here are some common issues and solutions:
*Stuck Nuts and Bolts:
If the nuts and bolts are corroded or stuck, applying penetrating oil and allowing it to soak for several minutes can help loosen them. In extreme cases, a torch may be needed to heat the metal and break the corrosion. However, exercise caution when using a torch, as it can damage the sink or surrounding materials. *Leaks:
Leaks are a common problem after installing a new sink basket strainer. The most common cause of leaks is improper application of plumber's putty or loose connections. Ensure that the putty is applied evenly and that all connections are tightened securely. *Incompatible Strainer:
If the new strainer does not fit properly in the sink opening, it may be the wrong size or type. Double-check the measurements and specifications of the strainer before proceeding with the installation. *Damaged Drainpipe:
If the drainpipe is damaged or corroded, it may need to be replaced as well. Consider replacing the drainpipe at the same time as the strainer to ensure a long-lasting and reliable plumbing system. *Material Compatibility:
When selecting a replacement strainer, ensure that the material is compatible with the sink material. For example, using a stainless steel strainer with a copper sink could lead to galvanic corrosion.Beyond these practical considerations, local plumbing codes should also be consulted. Specific jurisdictions may have regulations regarding the types of materials permitted and the methods of installation required. Ensuring compliance with these codes prevents potential future issues. The longevity of the new strainer also depends on the quality of the materials used and the frequency of sink usage. Higher-quality strainers, while potentially more expensive upfront, tend to last longer and require less frequent replacement.
Regular cleaning of the strainer basket also prolongs its lifespan and prevents clogs. Removing food debris regularly avoids the buildup of corrosive materials that can degrade the strainer over time. Periodically inspecting the strainer for signs of corrosion or damage allows for early intervention and prevents more significant plumbing problems from developing.

How To Replace A Kitchen Sink Basket Strainer Diy Family Handyman

Kitchen Sink Basket Strainer Standard Drain Replacement 3 1 2 Inc Stainles Steel

Kitchen Sink Basket Strainer Replacement Ifixit Repair Guide

Kitchen And Bathroom Sink Strainer Stainless Steel Drains Basket Replacement For Standard Drain Out Water

How To Install A Kitchen Sink Strainer Double Basket

Plumbing How To Replace My Kitchen Sink Basket With No Lock Nut Home Improvement Stack Exchange

2pcs Kitchen Sink Basket Strainer Replacement Drain For Brushed Stainless Steel Floor Made In China Com

How To Replace A Kitchen Sink Basket Strainer Drain Strain

Kitchen Sink Basket Strainer Replacement For Standard Drains 3 1 2 Inch Heavy Duty Stainless Steel With Rubber Stopper Sinks

3 In 1 Kitchen Sink Drain Strainer Stainless Steel Basket Stopper Filter Anti Clog Rust Resistant Easy Clean