Mobile Home Sink Faucet Replacement: A Comprehensive Guide
Replacing a sink faucet in a mobile home is a task that many homeowners undertake, either due to a malfunctioning faucet, a desire for an updated aesthetic, or to improve water efficiency. This process, while seemingly straightforward, requires careful planning and execution to avoid potential plumbing issues and ensure a secure, leak-free installation. Understanding the unique considerations for mobile home plumbing systems compared to traditional residential plumbing is crucial for a successful faucet replacement.
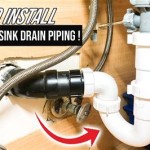
Mobile homes often have distinct plumbing configurations characterized by the use of PEX (cross-linked polyethylene) tubing rather than copper or galvanized steel pipes. These systems are designed for flexibility and cost-effectiveness, but they necessitate specific tools and techniques when making connections or disconnections. Furthermore, the close proximity of plumbing fixtures within a mobile home can create accessibility challenges, requiring a thoughtful approach to each step of the replacement process.
Prior to beginning any faucet replacement project, gathering the necessary tools and materials is paramount. This includes the new faucet assembly, adjustable wrenches, a basin wrench (also known as a sink wrench), plumber's tape, a bucket, towels or rags to clean up spills, and potentially a pipe cutter or PEX crimping tool, depending on the existing plumbing connections. Safety precautions should also be considered, such as wearing eye protection and gloves to prevent injury and protect against potential irritants.
Key Point 1: Identifying the Correct Replacement Faucet
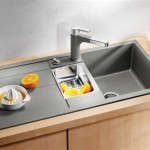
Selecting the proper replacement faucet is a critical initial step. Mobile home sinks often come in various configurations, including single-hole, center-set, and widespread designs. Understanding the existing faucet configuration is essential to ensure that the new faucet will properly align with the sink's mounting holes. Incorrect faucet selection can lead to compatibility issues and require modifications to the sink or countertops, potentially adding unnecessary complexity and expense to the project.
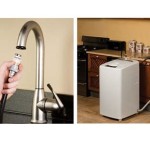
Beyond the physical configuration, it's important to consider the faucet's functionality and features. For instance, the choice between a standard faucet and a pull-down or pull-out sprayer faucet depends on individual needs and preferences. Factors such as water pressure and water usage habits should also influence the selection process. Opting for a WaterSense-labeled faucet can significantly reduce water consumption without compromising performance, contributing to long-term cost savings and environmental sustainability.
Material quality is another crucial aspect to evaluate. Faucets constructed from solid brass or stainless steel tend to be more durable and resistant to corrosion than those made from cheaper materials. While these options may have a higher initial cost, they often provide superior longevity and require less frequent replacement. Carefully reviewing product specifications and customer reviews can provide valuable insights into the quality and reliability of different faucet models.
Furthermore, aesthetic considerations play a significant role in faucet selection. Choosing a faucet that complements the overall style and décor of the mobile home's kitchen or bathroom can enhance the visual appeal of the space. Faucets are available in a wide range of finishes, including chrome, brushed nickel, oil-rubbed bronze, and matte black. Selecting a finish that coordinates with other fixtures and hardware can create a cohesive and visually pleasing design.
Key Point 2: Safe and Effective Disconnection of the Old Faucet
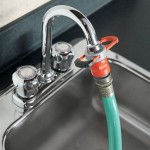
The first practical step in the faucet replacement process is disconnecting the water supply. This usually involves locating the shut-off valves beneath the sink and turning them off firmly in a clockwise direction. In some cases, there may only be a main shut-off valve for the entire mobile home's water supply. If this is the case, it is vital to turn off the main valve before proceeding. After shutting off the water supply, it is recommended to turn on the existing faucet to relieve any residual pressure in the pipes, preventing unexpected water sprays during disconnection.
Once the water supply is secured, place a bucket under the sink to catch any remaining water that may be present in the pipes. Using an adjustable wrench or basin wrench, carefully disconnect the water supply lines from the existing faucet. Basin wrenches are specifically designed to reach into tight spaces under sinks, making it easier to loosen and tighten connections. When disconnecting the lines, it's essential to avoid applying excessive force, as this can damage the pipes or the faucet itself.
Next, disconnect any sprayer hoses or other accessories attached to the existing faucet. These components typically have quick-connect fittings or threaded connections that can be easily disconnected by hand or with a small wrench. Take note of the order and orientation of these connections to ensure proper reassembly later on. If the existing faucet is secured to the sink with mounting nuts or screws, use a basin wrench or screwdriver to loosen and remove them. These fasteners can sometimes be difficult to access, requiring patience and careful maneuvering.
With all connections disconnected, carefully lift the old faucet out of the sink. It is advisable to inspect the sink's mounting surface for any signs of corrosion or damage. If necessary, clean the surface thoroughly to ensure a proper seal for the new faucet. Remove any old plumber's putty or sealant from the sink and surrounding area, preparing it for the installation of the new faucet.
Key Point 3: Installing and Securing the New Faucet
Before installing the new faucet, carefully review the manufacturer's instructions. These instructions provide specific guidance on the installation process, including the proper assembly of components and the recommended torque for tightening connections. Familiarizing oneself with the instructions beforehand can help prevent errors and ensure a successful installation. Begin by attaching any necessary accessories, such as sprayer hoses or soap dispensers, to the new faucet body according to the manufacturer's instructions.
Apply a thin bead of plumber's putty or silicone sealant around the base of the new faucet to create a watertight seal between the faucet and the sink. This sealant helps prevent water from seeping underneath the faucet and causing damage to the countertop or cabinet below. Carefully position the new faucet in the sink's mounting holes, ensuring that it is properly aligned and centered. Secure the faucet to the sink using the provided mounting hardware, such as nuts, screws, or brackets. Tighten the fasteners evenly to avoid warping or damaging the sink or faucet.
Next, connect the water supply lines to the new faucet. If the existing supply lines are compatible, they can be reused. However, it is often recommended to replace them with new supply lines to ensure a reliable and leak-free connection. When connecting the supply lines, use plumber's tape (also known as Teflon tape) to wrap the threads of the fittings. This tape helps create a tighter seal and prevents leaks. Tighten the connections securely with an adjustable wrench, but avoid over-tightening, as this can damage the fittings or the supply lines.
After connecting the water supply lines, turn on the shut-off valves slowly and check for leaks around the connections. If any leaks are detected, tighten the connections slightly or reapply plumber's tape as needed. Once the connections are leak-free, turn on the faucet and check for proper water flow. Also, test any additional features, such as the sprayer or soap dispenser, to ensure they are functioning correctly. Allow the water to run for a few minutes to flush out any debris or air from the plumbing system. Finally, clean up any spills or messes and dispose of the old faucet and packaging materials responsibly.
Maintaining the new faucet involves regular cleaning to prevent mineral buildup and corrosion. Use a soft cloth and mild detergent to clean the faucet's surface, avoiding abrasive cleaners that can scratch or damage the finish. Periodically check the connections for leaks and tighten them if necessary. With proper installation and maintenance, a new faucet can provide years of reliable service and enhance the functionality and aesthetics of the mobile home's kitchen or bathroom. When encountering complications beyond the scope of one's abilities, consulting with a qualified plumbing professional is always advisable to prevent potential damage and ensure compliance with local plumbing codes.

Mobile Home Kitchen Faucet With Sprayer

Brushed Nickel Rv Mobile Home Pullout Faucet With Single Lever Sprayhead Stream Or Spray Option 3 1 Hole Sink

White Rv Mobile Home Kitchen Faucet With Hi Rise Spout Teapot Handles

Bathroom Lavatory Faucet

Brushed Nickel Rv Mobile Home Kitchen Faucet With Gooseneck Spout

Brushed Nickel Rv Mobile Home Kitchen Faucet With 25mm Gooseneck Spout Solid Sabre Handles

Mobile Home Kitchen Faucet With Sprayer

Rv Mobile Home Single Handle High Rise Kitchen Faucet Stainless Steel Finish

Brass Rv Mobile Home Replacement Stems For Kitchen Faucet Bathroom

Ultra Faucets Uf08005cf Rv Mobile Home Kitchen Sink Faucet Chrome Finish