Replace Drain In Bathroom Sink
A clogged or leaky drain in the bathroom sink can be a major inconvenience. If you're experiencing either of these problems, you may need to replace the drain. Replacing a bathroom sink drain is a relatively simple task that can be completed in a few hours with the right tools and materials. Here are the steps on how to replace a drain in a bathroom sink:
Gather Your Tools and Materials
Before you begin, gather the following tools and materials:
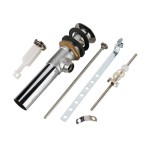
- New drain assembly
- Adjustable wrench
- Phillips screwdriver
- Putty knife
- Plumber's putty or silicone sealant
- Flashlight (optional)
Turn Off the Water Supply
Once you have gathered your tools and materials, turn off the water supply to the sink. You can do this by closing the shut-off valves under the sink. If there are no shut-off valves, you will need to turn off the main water supply to the house.
Remove the Old Drain Assembly
Once the water supply is turned off, you can remove the old drain assembly. To do this, use an adjustable wrench to loosen the locknut that is holding the drain assembly in place. Once the locknut is loose, you can remove the drain assembly by pulling it straight up.
Clean the Drain Hole
Once the old drain assembly is removed, clean the drain hole. Use a putty knife to remove any old putty or sealant from around the drain hole. You can also use a flashlight to inspect the drain hole for any damage. If there is any damage, you will need to repair it before installing the new drain assembly.
Apply Plumber's Putty or Silicone Sealant
Before installing the new drain assembly, apply a bead of plumber's putty or silicone sealant around the drain hole. This will help to seal the drain and prevent leaks. Be sure to smooth out the putty or sealant so that it is evenly distributed around the drain hole.
Install the New Drain Assembly
Once the putty or sealant is applied, you can install the new drain assembly. To do this, insert the drain assembly into the drain hole and tighten the locknut. Be sure to tighten the locknut securely, but do not overtighten it.
Turn On the Water Supply and Test the Drain
Once the new drain assembly is installed, turn on the water supply and test the drain. Run water into the sink and check for any leaks. If there are any leaks, tighten the locknut further. You may also need to apply more putty or sealant around the drain hole.
Finish Up
Once the drain is working properly, you can finish up by cleaning up the area. Wipe away any excess putty or sealant from the sink and drain. You can also use a damp cloth to wipe down the sink and faucet.

How To Replace A Rusty Sink Drain Howtolou Com Youtube

How To Replace A Drain In The Bathroom Sink Right Way

How To Install Bathroom Sink Drain Queen Bee Of Honey Dos

Sink Drain Flange Replacement Bathroom Youtube

How To Replace A Bathroom Sink Drain Youtube

How To Replace A Rusty Sink Drain Howtolou Com Youtube

Universal Washbasin Water Head Leaking Stopper Bathroom Sink Drain Strainer For And Bathtub Replacement Parts Silver Wal Com

How To Replace A Rusty Sink Drain Howtolou Com Youtube

Bathroom Sink Popup And Stopper Problems

How To Replace A Pop Up Sink Drain Install The New Handymanhowto In 2024 Bathroom