Replacing Your Kitchen Sink Sprayer Head: A Step-by-Step Guide
The kitchen sink sprayer head is a vital component of any modern kitchen, offering convenience and versatility for washing dishes, cleaning produce, and filling pots and pans. Over time, these sprayer heads can become worn, damaged, or simply lose their functionality. Replacing your kitchen sink sprayer head is a relatively simple task that can be accomplished with basic tools and a few minutes of your time. This article will guide you through the process of replacing your kitchen sink sprayer head, ensuring a smooth and successful experience.
Understanding Your Kitchen Sink Sprayer Head
Before initiating the replacement process, it is crucial to understand the different types of kitchen sink sprayer heads and the components that make up your current system. There are primarily two types of sprayer heads: pull-down and pull-out. Pull-down sprayer heads are connected to the faucet and are retracted by a spring mechanism, while pull-out sprayer heads are mounted on a hose that extends from the faucet.
The components of a kitchen sink sprayer head include the sprayer head itself, the hose, the mounting bracket, and the connection to the faucet. Depending on your specific faucet model, the connection mechanism may be a threaded connection or a quick-connect system. Familiarizing yourself with these components and their connection points will facilitate the replacement process.
Steps for Replacing Your Kitchen Sink Sprayer Head
Replacing your kitchen sink sprayer head is a fairly straightforward process that involves the following steps:
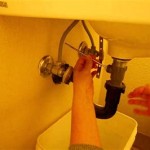
- Turn off the water supply. Locate the water shutoff valve for your kitchen sink and turn it off completely. This will prevent water from leaking during the replacement process.
- Disconnect the old sprayer head. Depending on the type of connection, you may need to unscrew the sprayer head from the faucet or remove it by detaching the quick-connect fitting. If the connection is difficult to remove, you can use a wrench or pliers to loosen it.
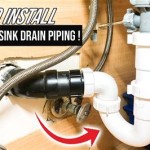
- Remove the old hose (if necessary). If you are replacing the entire sprayer head and hose, remove the old hose from the mounting bracket attached to the faucet. If the hose is connected using a quick-connect fitting, simply pull it apart. If the hose is connected with a threaded connection, unscrew it from the bracket.
- Install the new hose (if necessary). If installing a new hose, attach it to the mounting bracket using the quick-connect fitting or threaded connection. Make sure the hose is securely attached.
- Install the new sprayer head. Connect the new sprayer head to the faucet using the appropriate connection method. If it is a threaded connection, screw it into the faucet. If it is a quick-connect system, simply push the sprayer head onto the faucet.
- Tighten the connections. Once the new sprayer head is installed, tighten the connections to ensure a secure fit and prevent leaks. If there is a threaded connection, use a wrench or pliers to tighten it until it is firm but not overly tightened.
- Turn the water supply back on. Slowly turn the water supply back on, and check for any leaks at the connections. If there are any leaks, tighten the connections further until the leak stops.
- Test the new sprayer head. Once you have confirmed that the sprayer head is securely installed and there are no leaks, test the sprayer head by turning on the water and spraying it in all directions. Ensure that the sprayer head is working properly.
Tips for Success
Here are some helpful tips to ensure a successful replacement process:
- Read the manufacturer's instructions. Before beginning the replacement process, carefully read the instructions provided by the manufacturer of your new sprayer head. These instructions will provide specific guidance on the installation process for your particular model.
- Use appropriate tools. Ensure you have the necessary tools for the replacement process, such as a wrench, pliers, and a screwdriver. Using the appropriate tools will make the process easier and more efficient.
- Wear safety glasses and gloves. When working with tools and water, it is essential to wear appropriate safety gear. Safety glasses will protect you from potential debris, and gloves will protect your hands from sharp edges or rough surfaces.
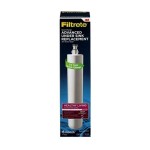
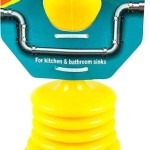
- Purchase a compatible sprayer head. Ensure that the new sprayer head is compatible with your kitchen sink faucet. Check the manufacturer's specifications and make sure the connection type and thread size match your existing faucet.
- Clean the faucet and sprayer head connections. Before installation, clean the faucet connections with a damp cloth to remove any dirt or debris that could hinder a proper connection.
- Choose a high-quality sprayer head. Invest in a high-quality sprayer head made from durable materials. This will ensure a longer lifespan and optimal performance.

How To Change A Kitchen Sink Spray

Wowow Brushed Nickel Kitchen Sink Faucet Replacement Parts 3 Modes Head Pull Out Spray For G1 2 Connector H5003 Lw At Com

How To Replace A Sink Sprayer The Home

Wowow Brushed Nickel Kitchen Sink Faucet Replacement Parts 3 Modes Head Pull Out Spray For G1 2 Connector H5003 Lw At Com

Plumb Pak Pp815 2cp Faucet Spray Head Chrome

Pull Down Faucet Replacement Head 2 Functions Kitchen Sprayer G 1 Out Spray For Brushed Nickel Sink Wal Com

How To Replace Your Pull Out Sink Sprayer But Not The Hose Youtube

Replacement Chrome Side Sprayer Pull Out Spray Head Universal For Kitchen Sink Faucet

Plumb Pak Pp815 2bn Faucet Spray Head Brushed Nickel

1 Sink Faucet Head Replacement With 9 Adapters 3 Function Pull Down Spray Kitchen Sprayer Nozzle