Rough Plumbing For Kitchen Sink
Rough plumbing for a kitchen sink is the first step in installing a new sink. It involves running the water supply lines and drainpipe to the location of the sink. Rough plumbing can be done by a do-it-yourselfer with basic plumbing skills, but it is often best to hire a professional plumber to ensure the job is done correctly.
Materials Needed
Before starting the rough plumbing, you will need to gather the following materials:
- Water supply lines (1/2-inch copper or PEX)
- Drainpipe (1-1/2-inch PVC)
- P-trap
- Vent pipe (1-1/2-inch PVC)
- Pipe fittings (elbows, tees, couplings)
- Sink flange
- Faucet
- Screwdriver
- Wrench
- Hacksaw
- Level
Step 1: Determine the Location of the Sink
The first step is to determine the location of the sink. This will be based on the layout of your kitchen and the location of the existing water supply lines and drainpipe. Once you have determined the location of the sink, mark it on the wall.
Step 2: Run the Water Supply Lines
The next step is to run the water supply lines to the location of the sink. The water supply lines should be made of 1/2-inch copper or PEX. If you are using copper, you will need to solder the joints. If you are using PEX, you can simply push the fittings onto the pipe.
Step 3: Install the Drainpipe
The next step is to install the drainpipe. The drainpipe should be made of 1-1/2-inch PVC. The drainpipe should be installed at a slight downward angle so that water will drain properly. You will also need to install a P-trap under the sink. The P-trap will prevent sewer gases from entering the kitchen.
Step 4: Install the Vent Pipe
The next step is to install the vent pipe. The vent pipe is a vertical pipe that allows air to enter the drain system. This helps to prevent the drain from becoming clogged. The vent pipe should be installed at least 6 inches above the highest fixture on the drain system.
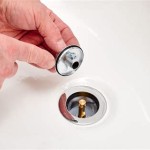
Step 5: Install the Sink Flange
The next step is to install the sink flange. The sink flange is a metal ring that is installed around the drain hole in the countertop. The sink flange will help to hold the sink in place and prevent water from leaking around the drain.
Step 6: Install the Faucet
The final step is to install the faucet. The faucet should be installed according to the manufacturer's instructions. Once the faucet is installed, you can turn on the water supply and check for leaks.
Tips
- When running the water supply lines, make sure to use a level to ensure that the lines are level.
- When installing the drainpipe, make sure to use a P-trap to prevent sewer gases from entering the kitchen.
- When installing the vent pipe, make sure to install it at least 6 inches above the highest fixture on the drain system.
- When installing the sink flange, make sure to use a sealant to prevent water from leaking around the drain.
- When installing the faucet, make sure to follow the manufacturer's instructions.

Plumbing Standard Height For Kitchen Sink Drain Exit From Wall Home Improvement Stack Exchange

Organizing Kitchen Rough Ins Jlc

May 2024 Up And Adam Ries

Kitchen Sink Plumbing Rough In Diagram

Rough Plumbing Renovating The Pocket

Pin Page

Kitchen Sink Plumbing Rough In Diagram

Plumbing Rough In Brohaha

Trap Arm Learn About Dirty Arms With This Plumbing Diagram

New House Can T Figure Kitchen Sink Rough In Plumbing Forums Professional Diy Forum