Sealing Sink Drain With Silicone
Dealing with a leaky sink drain can be a frustrating and inconvenient issue, often resulting in water damage or mold growth. Fortunately, sealing the drain with silicone is a straightforward and effective solution that can be accomplished in a few simple steps. This guide will provide comprehensive instructions on how to seal a sink drain with silicone, ensuring a watertight seal that will prevent leaks and maintain the functionality of your sink.
Step 1: Gather Necessary Materials
Before commencing the sealing process, gather the following materials: - Silicone sealant - Caulking gun - Utility knife or razor blade - Rubbing alcohol or denatured alcohol - Soft cloths or paper towels
Step 2: Prepare the Sink Drain
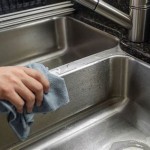
Begin by thoroughly cleaning the sink drain and surrounding area with rubbing alcohol or denatured alcohol. This will remove any dirt, debris, or old sealant that may interfere with the adhesion of the new silicone. Use a soft cloth or paper towel to wipe the surface dry.
Step 3: Cut the Silicone Tube and Apply Bead
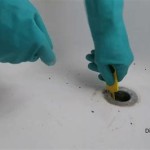
Cut the tip of the silicone sealant tube at a 45-degree angle, creating a small opening. Insert the tube into the caulking gun and apply a thin, continuous bead of silicone around the base of the drain flange, where it meets the sink surface. Ensure that the bead is applied evenly and without any gaps.
Step 4: Smooth the Silicone
Use your finger or a damp cloth to smooth out the silicone bead, pressing it gently into the gap between the drain flange and the sink. Create a smooth and slightly concave surface to prevent water from pooling on the seal. Do not overwork the silicone, as this can weaken the bond.
Step 5: Allow the Silicone to Cure
Refer to the manufacturer's instructions on the silicone sealant tube to determine the curing time. Typically, silicone sealants take several hours to fully cure, but it is important to allow ample time for the sealant to reach its maximum strength before using the sink.
Step 6: Inspect and Touch Up
Once the silicone has cured, inspect the seal for any gaps or imperfections. If necessary, apply a small amount of additional silicone to fill any gaps and smooth out the surface. Allow the touch-up sealant to cure thoroughly before using the sink.
Tips for a Successful Seal
- Use high-quality silicone sealant specifically designed for bathroom or kitchen applications. - Ensure the sink drain and surrounding area are completely clean and dry before applying the silicone. - Apply the silicone bead continuously and without any breaks. - Smooth the silicone carefully to create a watertight seal. - Allow ample time for the silicone to cure before using the sink.

Bathroom How Do I Seal The Sink Basin Opening Home Improvement Stack Exchange

Getting A Watertight Seal On The Sink Drain Assembly

Silicone Instead Of Plumbers Putty On Kitchen Drain Basket Youtube

Silicone Drain Pipe Sealing Plug Sewer Deodorant Seal Cover Kitchen Washing Machine Drainage Basin

Silicone Floor Drain Cover Stopper Anti Odor Sewer Pipe Drainage Sealing Fix Plug For Bathroom Kitchen Sink Washing Machine Hose

Bathroom Sink Plumbing Installation Diy Montreal

How To Fix Bathroom Sink Drain Leaks Underneath Gasket Threads Solved Youtube

Silicone Drain Pipe For Kitchen Sink Trap Dish Drainer Sewer Sealing Plug Bathroom Accessories Siphon Bathtub Home Aliexpress

Mer Maid Drain Magic

How To Remove A Bathroom Sink Drain Sealed With Silicone Sealant