Sink Drain for Garbage Disposal: A Comprehensive Guide
The sink drain assembly for a garbage disposal unit is a crucial component of a modern kitchen, facilitating the efficient disposal of food waste while maintaining proper drainage. This assembly differs significantly from a standard sink drain due to the integration with the disposal unit, requiring robust construction and a specific design to handle the increased loads and potential for clogging. Understanding the components, installation process, and maintenance requirements of a garbage disposal sink drain is essential for homeowners and plumbing professionals alike.
The primary function of this drain is to create a secure and watertight connection between the garbage disposal unit and the sink basin. It allows ground-up food particles and water to flow seamlessly into the drain pipes, preventing leaks and ensuring proper waste removal. A well-functioning garbage disposal sink drain minimizes the risk of backups, odors, and damage to the surrounding cabinetry and plumbing system.
Key Components of a Garbage Disposal Sink Drain Assembly
A typical garbage disposal sink drain assembly comprises several key components, each playing a vital role in its overall functionality. These parts are often specific to garbage disposal units and are not interchangeable with standard sink drain parts. A thorough understanding of these components is crucial for proper installation, troubleshooting, and repair.
1. Sink Flange: The sink flange is the topmost part of the assembly, fitted into the sink opening. It provides a secure point of attachment for the entire drain system. Sink flanges are usually constructed from stainless steel or durable polymers to resist corrosion and wear. They come in various sizes to accommodate different sink basin thicknesses, so selecting the correct flange is crucial for a watertight seal. The flange typically includes a rubber gasket or plumber's putty to create a seal between the flange and the sink basin. A tightening mechanism, often a set of screws, secures the flange in place.
2. Mounting Assembly: The mounting assembly is the intermediary component that connects the sink flange to the garbage disposal unit. This assembly facilitates the secure attachment and alignment of the disposal. It usually comprises several parts, including a mounting ring, fiber gasket, support ring, and locking mechanism. The specific design of the mounting assembly can vary depending on the brand and model of the garbage disposal. Correct assembly of these components is critical for a stable and leak-free connection between the sink and the disposal unit. The fiber gasket provides a crucial seal, preventing water from leaking between the sink flange and the disposal unit.
3. Dishwasher Inlet: Many garbage disposals include a dishwasher inlet, a small nozzle that allows wastewater from the dishwasher to drain through the disposal unit. This feature helps to prevent clogs in the dishwasher drain line and allows the disposal to grind up any food particles that may have accumulated in the dishwasher filter. The inlet usually has a knockout plug that must be removed before connecting the dishwasher drain hose. Failure to remove the plug can result in a backflow of wastewater into the dishwasher, potentially damaging the appliance.
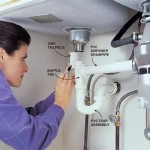
4. Tailpiece: The tailpiece is a short pipe that extends downward from the bottom of the garbage disposal unit. It connects to the P-trap, which is an essential component in preventing sewer gases from entering the home. The tailpiece is typically made of plastic or metal and may come in different lengths and diameters depending on the specific installation requirements. Careful measurement and selection of the appropriate tailpiece are necessary to ensure a proper fit with the existing plumbing.
5. P-Trap: The P-trap is a U-shaped pipe that traps a small amount of water, creating a seal that prevents sewer gases from rising up through the drain. It is a critical component in maintaining a sanitary and odor-free environment in the kitchen. The P-trap is typically made of PVC or metal and is connected to the tailpiece of the garbage disposal and the drainpipe leading to the sewer system. Regular cleaning of the P-trap is recommended to prevent the accumulation of debris and potential clogs.
6. Drainpipe and Connections: The drainpipe carries wastewater away from the P-trap and into the main sewer line. It is typically made of PVC or metal and is connected to the P-trap using fittings. Proper installation of the drainpipe and connections is essential for preventing leaks and ensuring efficient drainage. The use of Teflon tape or pipe dope on threaded connections is recommended to create a watertight seal.
Installation Procedures for a Garbage Disposal Sink Drain
Installing a garbage disposal sink drain requires careful attention to detail and adherence to proper plumbing practices. While some homeowners may choose to tackle this project themselves, it is often recommended to hire a qualified plumber, especially if there are existing plumbing issues or a lack of experience. This section outlines the general steps involved in installing a garbage disposal sink drain.
1. Removal of Existing Drain: The first step involves removing the existing sink drain assembly. This typically involves disconnecting the P-trap, drainpipe, and any other connected plumbing. It is essential to turn off the water supply before disconnecting any plumbing to prevent flooding. Use a wrench or pliers to loosen the connections and carefully remove the drain components. Be prepared for some water to spill out, so have a bucket or towels handy. Clean the sink opening thoroughly to remove any old putty or residue.
2. Assembly of the Sink Flange: The next step is to assemble the sink flange. Apply plumber's putty or a rubber gasket to the underside of the flange and insert it into the sink opening. Secure the flange in place by tightening the screws or locking mechanism from underneath the sink. Ensure that the flange is properly seated and provides a watertight seal against the sink basin. Remove any excess putty that squeezes out from under the flange.
3. Attachment of the Mounting Assembly: Attach the mounting assembly to the sink flange. This typically involves sliding the mounting ring, fiber gasket, and support ring onto the flange and securing them in place with a locking mechanism. Refer to the garbage disposal's instruction manual for specific details on how to assemble the mounting assembly properly. Ensure that all components are aligned correctly and that the locking mechanism is securely fastened.
4. Mounting the Garbage Disposal: Carefully lift the garbage disposal unit and align it with the mounting assembly. Rotate the disposal until it locks into place. Some models may require the use of a special tool or wrench to secure the disposal. Ensure that the disposal is properly aligned and firmly attached to the mounting assembly. Check for any gaps or loose connections.
5. Connecting the Dishwasher Inlet: If the garbage disposal includes a dishwasher inlet, remove the knockout plug and connect the dishwasher drain hose. Secure the hose in place with a clamp. Ensure that the hose is properly routed and does not kink or bend sharply. A properly connected dishwasher inlet prevents backflow and facilitates efficient drainage of wastewater.
6. Connecting the Tailpiece and P-Trap: Attach the tailpiece to the bottom of the garbage disposal unit. Connect the P-trap to the tailpiece and the drainpipe leading to the sewer line. Ensure that all connections are tight and secure. Use Teflon tape or pipe dope on threaded connections to create a watertight seal. The P-trap should be properly positioned to create a water seal and prevent sewer gases from entering the home.
7. Testing for Leaks: Once the installation is complete, turn on the water supply and check for leaks around all connections. Run the garbage disposal to ensure that it is operating smoothly and that there are no unusual noises or vibrations. If any leaks are detected, tighten the connections or disassemble and reassemble the affected components. It is crucial to address any leaks promptly to prevent water damage and mold growth.
Maintenance and Troubleshooting of Garbage Disposal Sink Drains
Proper maintenance is essential for ensuring the longevity and efficient operation of a garbage disposal sink drain. Regular cleaning and preventative measures can help prevent clogs, odors, and other common problems. This section outlines some key maintenance tips and troubleshooting steps.
1. Regular Cleaning: Regularly flush the garbage disposal with cold water to remove food debris and prevent clogs. Avoid pouring grease or oil down the drain, as these substances can solidify and cause blockages. Grinding ice cubes can help to dislodge debris and freshen the disposal. Baking soda and vinegar can also be used to clean and deodorize the disposal. Pour a cup of baking soda down the drain, followed by a cup of vinegar. Let the mixture fizz for 30 minutes, then flush with hot water.
2. Preventing Clogs: Avoid putting large amounts of food waste down the garbage disposal at once. Cut food scraps into smaller pieces to prevent clogs. Never put hard or fibrous materials, such as bones, coffee grounds, or celery stalks, down the disposal. These materials can damage the blades and cause clogs. Run the disposal with plenty of water to ensure that food particles are properly flushed down the drain.
3. Addressing Odors: If the garbage disposal is producing unpleasant odors, it may be due to accumulated food debris. Cleaning the disposal regularly can help to eliminate odors. Lemon or orange peels can also be ground up in the disposal to freshen the air. Alternatively, a commercial garbage disposal cleaner can be used to disinfect and deodorize the disposal.
4. Troubleshooting Common Problems: If the garbage disposal is not working properly, check the power switch to ensure that it is turned on. Check the reset button on the bottom of the disposal to see if it has tripped. If the disposal is jammed, use tongs or pliers to remove any obstructions. Never put your hand inside the disposal. If the disposal continues to malfunction, it may need to be repaired or replaced.
5. Leak Detection and Repair: Regularly inspect the garbage disposal sink drain for leaks. Check around the sink flange, mounting assembly, tailpiece, and P-trap. If any leaks are detected, tighten the connections or replace any damaged components. A leaky garbage disposal sink drain can lead to water damage and mold growth, so it is important to address any leaks promptly. Using plumber’s putty and Teflon tape can help prevent leaks during installation and repairs.

Oatey 1 2 In White Plastic Slip Joint Garbage Disposal Install Kit With Dishwasher Connector Hdc9104 The Home

Universal Kitchen Sink Strainer Stopper For Garbage Disposals Kraus

Disposal Kit Under Sink Plumbing At Com

Garbage Disposal Backing Up Into Sink Mr Rooter Plumbing

Oatey 1 2 In Black Slip Joint Garbage Disposal Kit Hdc9100t

Diy Kitchen Sink Plumbing With Garbage Disposal Start To Finish Step By Youtube

Ruvati Kitchen Sink Garbage Disposal Flange With Basket Strainer And Stopper Stainless Steel Rva1042st Usa
:max_bytes(150000):strip_icc()/garbage-disposal-buying-guide-2718864-hero-205069e72e6a4575b3131db47a6ace26.jpg?strip=all "How To Choose The Best Garbage Disposal")
How To Choose The Best Garbage Disposal

How To Install A Garbage Disposal True Value Hardware

Plumbing How Do You Drain A Garbage Disposal Home Improvement Stack Exchange